Shaft Bearing Etiquette
Story and photos by Steve D’Antonio
Shaft bearings play a vital role, however, the nuances of their selection, operation and maintenance are often overlooked.
Insidiously, in many cases shafts and bearings are improperly aligned, the result of which may be accelerated bearing and shaft wear, increased fuel consumption and vibration. I say insidiously because an improperly aligned bearing/shaft can lead a casual or inexperienced inspector to conclude that the former isn’t worn and therefore cleared for another season of use. In fact, nothing could be further from the truth and misalignment between a bearing and shaft is of far greater concern, and has the ability to cause more costly damage than a simple worn out bearing.
The common method for determining wear involves lifting or shaking the shaft, while it’s unscientific if it makes a ‘thunk’ then it’s worn, however, a misaligned shaft will often be bound within a bearing, preventing any movement. American Boat and Yacht Council guidelines do specify allowable clearances between shaft and bearing. A two inch shaft, for instance, may have up to 0.010” of clearance between it and the shaft bearing.
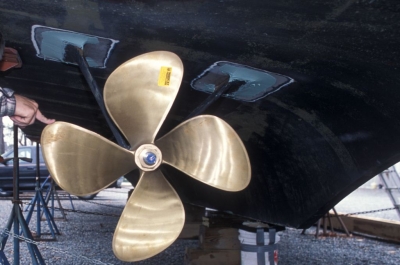
While not necessarily definitive, the ease with which a propeller can be turned while a vessel is hauled can be an indicator of shaft to bearing fit and alignment.
Because of a potential for incompatibility and resultant damage, petroleum-based greases and oils should never be used to lubricate shaft bearings.
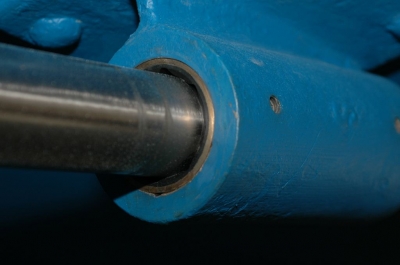
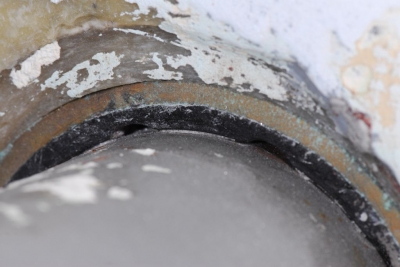
As I looked more closely at the shaft bearing I could see that the aft end at the three o’clock position was pinched, the rubber in the bearing was being squeezed, and the opposite side at the forward end of the bearing was similarly pinched, while the nine o’clock positions showed a noticeable gap.

The significant gap between this bearing and the shaft can be an indication of severe wear or misalignment.
This is a classic sign of shaft to bearing misalignment (not to be confused to with engine to shaft alignment) and one that demands immediate attention.
Yet another issue that afflicts some bearings is a swelling phenomenon. At first these scenarios may be mistaken for misalignment between shafts and bearings. However, I’ve encountered several vessels whose bearings inexplicably swelled, causing uniform shaft binding. This scenario can be avoided by using only high quality, name brand bearings.
How it Works
The outer support shell of the bearing may be made of either naval brass or a non-metallic composite. Because of the galvanic incompatibility of brass and aluminum, the non-metallic composite bearing variety is designed for, and must be used on struts or stern tubes made of aluminum or stainless steel alloy.
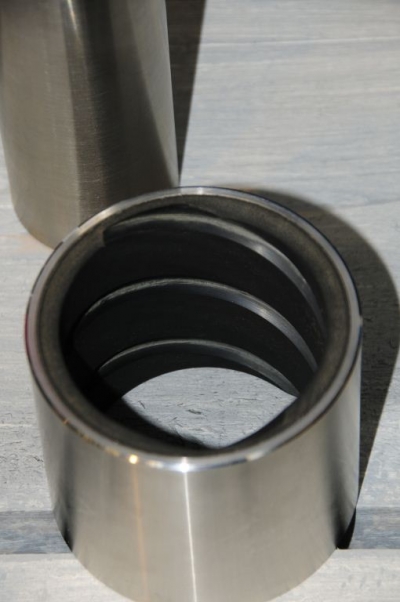
Not all shaft bearings rely on longitudinal groove, this one uses an involute design.
Under the circumstances in which it operates it’s remarkable that shaft bearings last as long as they do. Wear out, however, they most certainly do and when that time comes they must be replaced in order to avoid annoying vibration or even shaft, log or strut damage.
Because they aren’t easy, or inexpensive to replace, it’s worth making an effort to ensure that shaft bearings last as long as possible. Common causes of premature failure include improper installation of shaft anodes, if they are installed to close to the forward end of the bearing they can impede water flow, twelve inches is a minimum clearance between an anode and the leading end of the strut. Additionally, allowing an accumulation of hard barnacle growth on the shaft forward of the bearing can upset water flow, which leads to increased wear.
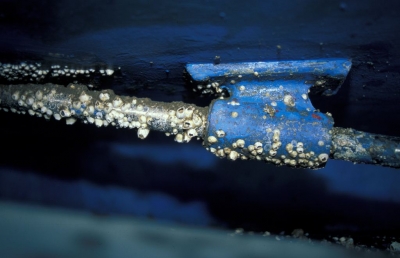
Shaft bearings rely on a steady, uninterrupted flow of water for lubrication. Hard growth on the shaft forward of the bearing can upset this flow and lead to accelerated wear.
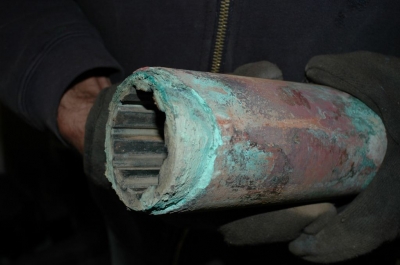
The metallic shell used for shaft bearings is often made of a brass alloy. Becuase brass alloys contain zinc they are prone to galvanic corrosion. This can be prevented with proper anodic protection, i.e. use of zinc or aluminum anodes. However, it’s important to keep in mind that the shell is somewhat sacrificial, it’s designed to corrode before the more valuable strut, and is more easily replaced.
Replacement
Removing a shaft bearing can be challenging, particularly when it’s installed in an en bloc shaft log or keel rather than a free standing strut. In either case, however, there are useful techniques that can be employed. Begin the process by removing the shaft. First, remove any set screws or locking nuts that may be used to secure the shaft to the coupling (the latter are inside the coupling and can’t be seen without separating it from the transmission). A shaft puller/slide hammer makes shaft removal easy, if you have access to one.

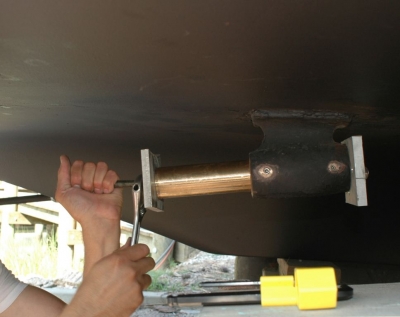
There are several ways to remove shaft bearings. Here, a hydraulic split drift removal tool is being used. While costly, on the order of $2500 at the time this was written, they make bearing removal easier in that the shaft does not require removal.
If not, you can insert a drift, a socket that’s slightly smaller in diameter than the shaft will do, between the shaft and transmission couplings and then, using long bolts draw the two couplings back together as the socket pushes the shaft out of its recess, then withdraw the shaft from the vessel completely. Under no circumstances should blunt force be used to remove a coupling or prop from a shaft, nor should such force be used to drive a shaft bearing out of or back into a strut.
The bearings used with this shaft suffered from swelling, making shaft removal extremely difficult (a come-along winch was required to pull the shaft out of the bearings). While not common, swollen bearings lead to accelerated shaft wear and increased fuel consumption. If your shaft is virtually impossible to turn by hand it may be suffering from this phenomenon.
Now on to bearing removal, remove the set screws securing the bearing in place. Using a reciprocating saw blade (just the blade, handles are available or you can make one with strips of wood and duct tape) whose tooth count is suitable for soft wood, cut into the bearing at one of the flutes, cut through the bearing shell, but not into the metallic strut or shaft log(this is the reason for not using a power tool). Once you’ve cut through the bearing shell drive a brass drift between the bearing and the strut or shaft log, lifting the bearing enough to grab it with a pliers or vice grip. Twisting and pulling will usually extract the bearing.
Alternatively, strut-mounted bearings can be removed using a mechanical or hydraulic ‘split drift’ bearing removal tool, without removal of the shaft. Many boat yards and marine contractors utilize such a kit. For professionals who undertake this task routinely it’s well worth the expense, the hydraulic version can cost over $2000, however, do- it- yourselfers will likely be relegated to the manual method.
A mechanical bearing installation tool made using a length of threaded rod and two sections of aluminum plate. This technique is easy on the strut and often works well. The alternative, and one that is frowned upon, involves using a mallet to drive the bearing into the strut.
Using the rod draw the new bearing into the strut by tightening the nuts. For an en-bloc log, drive the bearing into place using a block of soft wood and a mallet, and never strike the bearing directly.
female hex head pointed tip set screws, so they are flush or recessed. Set screws should be located at the 4 and 8 o’clock position, or alternatively at the 3 and 9 o’clock, but not in the hemisphere above this, using blue LocTite thread locking compound. Set screws should bear against the shaft bearing’s outer shell; the bearing shell should be partially spot drilled to create an indentation into which the set screw’s pointed tip will recess and engage, with the angle of the drilled indentation, and that of the set screw tip, being the same. Set screw tips must be pointed and not cupped (cupped set screws are not designed to be used with indentations). The bearing shell must not be drilled through completely. Among other things, doing so runs the risk of compressing the rubber bearing liner, which in turn can cause accelerated shaft wear.
This bearing has swollen, there is no gap between it and the shaft, making the shaft both difficult to turn and prone to accelerated wear.
When properly installed and maintained shaft bearings can be expected to deliver long, reliable service. If you experience premature or repeated failures, i.e. they last less than 500 hours, avoid simply replacing the bearing, make an effort to determine the cause of the problem.
For more information on the services provided by Steve D’Antonio Marine Consulting, Inc. please e mail Steve at info@stevedmarineconsulting.com
or call 804-776-0981