July 2021 Newsletter “Vented Loop Remote Drains”
Text and photos © 2021 Steve D’Antonio Marine Consulting, Inc.
Photo Essay: Vented Loop Remote Drains
Vented loops, sometimes called anti-siphon valves or siphon breaks, are very simple components that play an extremely important part in your vessel’s raw water systems, from bilge pumps to engines and gensets.
The mission of a vented loop is to admit air into a water filled hose that might otherwise be susceptible to establishing a siphon, which could in turn flood an engine with seawater, or flood the vessel itself, even to the point of sinking. Most vented loops rely on a small integral check valve, one that allows air to enter, but prevents water from escaping. For more on vented loops, see this article.
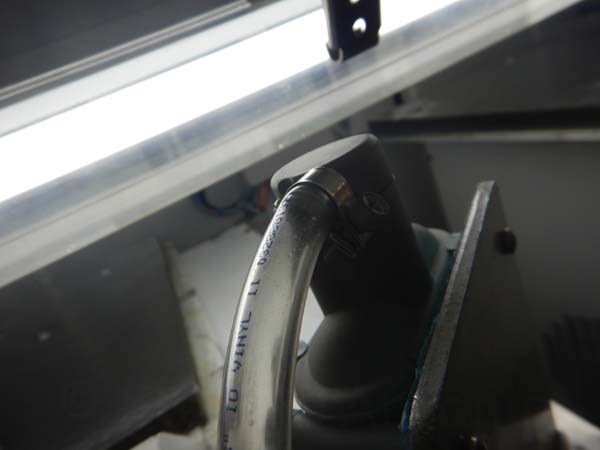
As simple as vented loops are, they do occasionally fail, with the most common mode being external leakage of water, and since they are often mounted above machinery, like engines and gensets, there is a natural and understandable temptation on the part of installers to fit a remote hose to the loop, most of which are equipped with a small pipe to hose adapter designed for this purpose, routing that leakage away from sensitive gear. As commendable as this effort may be, it’s fraught with the potential for disaster. If, for instance, the vent hose is routed to the bilge, and the bilge accumulates water, enough to submerge the end of the hose, water, instead of air, will be drawn into the vented loop, thereby preventing it from breaking the siphon, which in turn could lead to flooding. More insidious is the kinked or crushed remote hose scenario. In that case, the hose may be routed far from bilge water, however, if air cannot pass through it, because it, once again is crushed or kinked, a siphon may be established. I’ve encountered both scenarios, including those that led to a flooded new genset and flooded year-old propulsion engine.
In the accompanying images, a genset vented loop remote hose has kinked. Clear PVC hose, like that which is used here, is prone to this phenomenon, especially when warm. If you choose to remotely vent a vented loop, do so using crush/kink-proof hose, such as Type A or B marine fuel hose, making sure it is routed well above bilge water and terminated in a location where you will notice leakage, which is your signal to repair or replace the vented loop or its check valve. Additionally, it’s critically important that the hose be routed so that it drains completely; i.e. it must run continuously down-hill from the vent, so water, and salt, cannot accumulate within.
Ask Steve
Hi Steve,
Very, very relevant article on bedding compounds, as I am re-bedding many items on my 13-year-old N5025, Ophelia. Two further things that I would love to hear your opinion on: 1) the use of Butyl Tape and 2) chamfered holes to allow either PS or PU or butyl tape to sit
I’m currently redoing my fly davits and have some coring damage from a poor prior installation. I have removed the wet core, allowed it to dry out, and filled with epoxy resin. I will over drill mounting holes, chamfer the tops and install a king starboard base that will be 5200’d to deck. Liberal 4000 for the holes and butyl tape at the top chamfered edge of each thru bolt…..that is my plan!
Any flaws?!
Charlie Hodge
Charlie:
I regret not mentioning chamfering, I will update the article to include that. It is indeed worthwhile, as it creates an O ring of sorts under a flanged object that is to be bedded.
Butyl tape, or mastic, is steadily gaining in popularity. It’s cleaner to use than bedding, and by all accounts it lasts for decades, while remaining flexible. It’s well-suited to flanged installations such as hatches and ports, stanchions, cleats etc. There is a technique for its application, fasteners must be wrapped and the entire base of the flange must be covered with mastic just as it would be with caulk. The installation procedure is more time consuming as well, as it needs to be compressed slowly, and removing “squeeze out” may in some cases take longer, you can’t mask for it or simply wipe away with a plastic putty knife and a solvent wetted rag, and if any remains exposed it will attract dirt, unlike cured polyurethane sealant. Still, there are many applications where it will offer excellent, long-lasting results; making it worth considering.
However, you struck a chord with the mention of Starboard, which is a trade name for Ultra High Molecular Weight, or UHMW, plastic. I would not use King Starboard for a mounting base, backing block or most other structural applications, it is not reinforced, it deforms easily, and sealant does not adhere to it. Instead, consider GPO3 or G10, which is strong, reinforced, and ideally suited to structural applications, and sealant adheres to it very well. It does need to be painted.
Hello Steve,
Thank you for all your hard work writing and explaining the complexities of the marine boating industry. I have been working on boats of all sorts my whole life and have owned about 15 large boats, mostly commercial. I have a 100 ton CG with endorsements. I also own a repair and systems installation service for longer than 25 years. I have brought commercial boats up to Coast Guard standards and have done fuel tank designs and installation numerous times.
I was recently hired to bring a Grand Banks 42 up to date and get it ready for long distance cruising. One of the issues I have found with Grand banks or Marine Traders, and other Taiwan boats, is the fuel tanks. This particular had the old tanks cut out and replaced with stainless tanks, by the previous owner. These particular tanks aren’t certified, they’re also lacking tie downs. However, two other major things are concerning me; first there is no fuel pick up, but rather a fitting at the bottom of the tank with a ball valve. I was under the impression that is not legal any more, that your fuel pickup had to be on the top which is better anyways in many respects. The other concern is there was a site glass, made with plastic tubing connected to plastic fittings going into the tank. It did have a shut off at the bottom, a gate valve. No protection around the site glass. I didn’t think site glass (plastic tubing in this case) was legal any more.
Further, instead of a fuel rated fill hose, rigid home depot plumbing PVC was used. The fuel vent was red tracer clear water tubing. I don’t yet know if there are inspection ports.
I look forward to your response and what you know about the legalities, proper and technical aspects of the marine diesel fuel tank.
Thanks so much for all your articles.
Sincerely,
Ray Cayer
Ray:
Strictly speaking, in the U.S., there are no laws per se for fuel (and most other) systems on recreational diesel-powered vessels under 65 feet, neither the Coast Guard nor any other state or federal body weighs in on these systems and designs (that’s not the case for gasoline-powered vessels, their fuel and electrical systems are regulated by the Code of Federal Regulations). If it’s a commercial or passenger carrying vessel, that’s another matter, and laws do apply.
The American Boat and Yacht Council (ABYC) does offer guidance on these and many other systems, however, it’s purely voluntarily. Having said that, insurers often insist on ABYC compliance for critical systems (and boat owners and buyers should as well). For the work you do, if you aren’t already an ABYC member, I strongly recommend you join, among other things doing so will give you access to the Standards. I would also recommend you consider obtaining certifications in the diesel engine, electrical and systems categories, visit www.abycinc.org to join and learn more about education and training.
Now to your questions specifically.
- While top-mounted pickups are less likely to leak, there is no ABYC prohibition against locating fittings on the bottom of a diesel fuel tank. Bottom mounted fittings do allow for balancing of fuel levels. Fittings anywhere other than the top of a gasoline tank are prohibited.
- Sight glass material must be clear by necessity, in most cases this means the tubing will not meet ABYC standards for flame resistance. It is for that reason that every slight glass must be equipped with valves at the top and bottom, and these valves must remain closed at any time other than when the fuel level is being checked. Ideally, a fail-safe, spring loaded valve should be used, it closes automatically.
- There are no specific regulations regarding sight glass protection, however, common sense dictates that it be protected from damage and impact. Rugged, purpose-made sight glasses are available from several manufacturers.
- Fuel fill and vent hose must be either metallic pipe, with ABYC specific requirements for thickness and type, and/or USCG-rated A1 or A2 hose (most often the latter). PVC and other materials are not acceptable for a variety of reasons, primarily in that they are not certified for 2.5 minutes of exposure to flame.
Finally, if I were guiding your customer, I’d mandate that the new installation be fully compliant with the ABYC H-33 “Diesel Fuel Systems” Standard.
Dear Steve:
My friend Lee and I have an identical situation, shown in the photograph below. (Lee’s boat is a 2005 twin screw Mainship 34 and mine is a 2004 single screw Mainship 30).
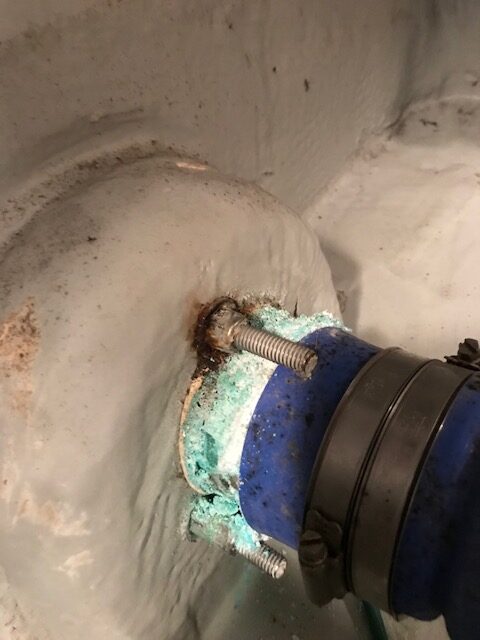
I have had this corrosion (?) for several years and Lee noticed his for the first time several months ago. The green ground wire to this part is clean and securely attached to one of the 3 bolts holding the part in place in the shaft log. Zincs on the prop shaft, trim tabs and main zinc on the transom (to which all green wires terminate) are doing their job and are replaced each year. The raw water strainer for engine cooling and the smaller strainer for the A/C have a similar greenish tinge to the surface but no fuzzy material that can be removed. Both strainers have green grounding wires.
When you clean the area shown in the photo with a brass brush, the outer fuzzy layer comes off easily but leaves a greenish patina on the fitting’s surface. In a week or two the fuzzy layer re-appears and the process of removal repeats itself. The fitting itself seems to be solid but looks can be deceiving. Can you diagnose the cause of the problem and recommend ways to keep it from happening? Thank you in advance for any help you can offer.
Sincerely,
Bernie Freeman
Bernie (and Lee):
The phenomenon you are experiencing is common, it occurs to virtually every copper-based alloy used in marine (and other) applications; the best-known example is bronze deck hardware such as ports and cleats, as well as the Statue of Liberty, copper roofs and many others. Known as verdigris, or cuprous oxide, it’s both normal and harmless. Based on your photo, unless the appearance is bothersome to you, it should be of little concern. If however, you ever see pink associated with underwater or raw water copper alloys such as bronze that is of concern as it indicates another type of corrosion called dezincification, you can read more about it here.
Of far greater concern is the rust emanating from beneath the stainless steel through bolt. Stainless steel is a less than ideal material for use in below the waterline applications such as this. Fasteners are especially problematic since most off the shelf varieties are made from 18-8 alloy, the least corrosion-resistant of those suited for marine applications (for stainless steel, 316 is preferred). Used inside the vessel they are fine, however, they can be problematic on deck where they are prone to staining, and they should definitely not be used for submerged applications such as this. Silicon, zinc-free bronze is a far better choice for this fastening role. For more on this subject see this article.
Steve,
I’ve owned a 1985 Ocean Alexander Mark I pilot house for about 14 years. The props are currently in Kruger & Son’s shop in Seattle for tune-up and repair (I struck a never seen object in the middle of Georgia Straight). The current props are 4-blade 28.5” X 22”. I provided engine and boat specs to Kruger to see if these were the correct size. The resulting analysis suggested 29” X 18”. I don’t recall the results the last time I tried to run at full RPM. If Kruger’s analysis is correct, I probably was not able to reach full RPMs (2800).
This is a full displacement boat with twin 330 Cummins 5.9 MBTAs. I generally cruise between 8.5 and 10 knots. Can you refer me to an article you’ve written that addresses the pros and cons of adjusting or getting replacement props? Kruger can get the pitch down to about 19”, and I’m wondering whether the benefits outweigh the costs. I appreciate any guidance you can provide.
Thank you,
Brent Walker
Brent:
In short, I would not agree to any prop adjustment or replacement, particularly if it’s based on a prop calculator’s results, until you have conducted a wide open throttle test, running your vessel in cruising trim, i.e. full fuel, water, provisions and gear, and ensuring the engine reaches the rated RPM. With that information you can then make determinations regarding propeller adjustment, if necessary. I’m a bit surprised a prop shop would recommend a prop replacement without the results of a sea trial.
Part I and Part II of this series on propellers may be helpful.
Along with this one on sea trial protocols.
Additionally, you can run your own prop calculations using one of the online prop calculators. A web search will yield many, however, here’s one.