November 2021 Newsletter “Means of Escape”
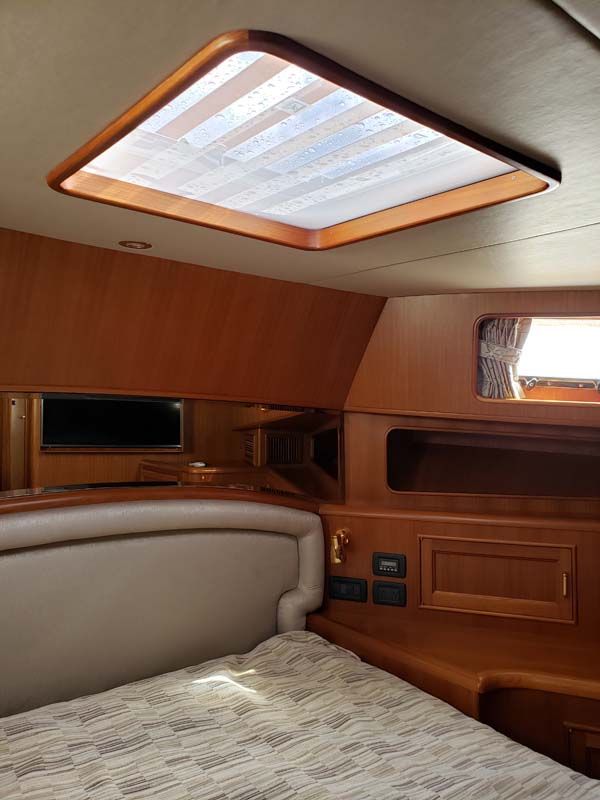
Photo Essay: Means of Escape
Can you get out? That’s the question you should be asking yourself as you walk through your vessel, if there’s a fire or flooding is there a means, or a secondary means, of escape? Usually this is accomplished with an overhead hatch or escape port, however, even in that case, can you, and every member of your crew, lift themselves up and through that hatch in an emergency? Have you ever tested this, have you practiced? If not, you should, and as you walk guests through emergency procedures make certain you include escape routes and gear that may be used to do so, including ladders like the one shown here.
Ask Steve
Greetings Steve,
For the past year I’ve been sailing and fixing up a 1969 Bristol 33.
Your article about engine mounts was extremely informative. I really appreciate your attention to detail.
I thought you might be able to tell me what (if any) my options might be for low-profile engine mounts.
I’m attempting to fit a Yanmar 3GM30F into the bilge’s engine area. The original Atomic 4 was decidedly rusted-up when I bought the boat. The Yanmar won’t sit low enough to align the prop shaft with the factory mounts. The space is too narrow. They also seem a bit squishy.
If it comes to it I might try making some mounts with rollerblade wheels or cast-able urethane, but I thought I’d ask your advice before going to such extremes. For now I will work on building new stringers. If I use flexible mounts, they need to be no more than 2″ tall. Do such things even exist?
Any thoughts are appreciated, even if you’d rather tell me to scrap the whole project and start over with a different engine (or boat!)
Engine-less sailing has treated me very well. I’m tempted to just make oar-locks for the winches and maybe do an electric conversion, but a diesel engine seems hard to beat.
Best,
David Earle
David:
The Bristol 33 is a venerable vessel, it seems as if this one is in good hands.
Yanmar motor mounts are especially high profile. I’ve never researched it but I assume Yanmar believes this is necessary to absorb vibration from these small three cylinder engines. Never the less, there are alternatives, here is one and another one.
Two inches, however, is a mighty tall, or short, order, I’m not sure either of these will fit, and still allow room for adjustment. If you opt to make your own you’ll need to incorporate a means of adjustment, even if that’s just the insertion of shims. These engines are particularly “lively”, so if you make your own you’ll likely be transmitting some of that movement to the vessel. You might find this article on the subject of engine alignment useful as you work through this project.
Steve,
Any advice you have on break-in of new diesel?
Any good articles?
Thank you,
M. Andre Vasu
Andre:
Of course you should follow the manufacturer’s instructions first. Having said that, going easy on a new diesel engine is doing it no favors. Chronic light or under loading can lead to cylinder glazing and blow by, neither of which are desirable. Once a cylinder is glazed the damage is done, so it’s best avoided from the outset. With a planing vessel that’s more easily accomplished, simply run at planing speeds for the first 50 hours or so. At that point I’d change the oil and then get into the habit of carrying out oil analysis with each oil change thereafter, following the engine manufacturer’s specified oil change interval. Make certain the analysis includes fuel dilution and TBN or Total Base Number, a measure of the oil’s ability to contend with acids created by the combustion process. For gensets, see this article.
Steve,
I have a question about AGM batteries. I have always had lead acid. Is it necessary once I start the generator to leave it running until the Xantrax goes into float mode? Also, I am only running the generator to charge the batteries. I have six 8D AGMs for the inverter and it takes 6 hours to float them. Do I need to add load to the generator?
Thanks in advance
Nick DeRaimo
Nick:
AGM batteries are lead acid, however, traditional batteries, those with liquid electrolyte inside, are referred to as “flooded”. There are many similarities between the two, and a few important differences.
From a charging perspective, all deep cycle lead acid batteries, flooded, AGMs and gels, benefit from being discharged no more than 50%, and then being recharged fully, to 100%. When the charger goes to float, it’s usually safe to assume the battery bank has reached 100%, or close to it. You can more accurately monitor the state of charge or SOC using an amp-hour meter.
Running the genset to power a battery charger alone is less than desirable, as it invariably and grossly leads to under loading of the genset, which has its own set of issues for diesel engines. If you can manage to run the genset to carry out other tasks while charging, doing laundry for instance or making water, that would be preferred. Six to eight hours is a very long time to run the genset to re-charge batteries. A bank made up of six 8D AGM batteries contains 1320 amp-hours (it varies slightly from manufacturer to manufacturer, I’m assuming 220 amp-hours per battery). If you discharged to 50%, that means you are replacing about 660 amp-hours.
You don’t mention the output of your charger, however, if it is 100 amps for instance, that should take roughly, and not coincidentally, about eight hours to get back to 100%, which is what you noted. Again, that’s a long time. If you increase the charge capacity, by adding say another 100 amp charger, that would increase genset load, at least during the bulk charge stage, while reducing charge time. AGM batteries are capable of initially accepting 100%, and in some cases more, of their amp-hour capacity, i.e. 1,300 or more amps in this case, and you are nowhere near that, so there’s clearly room for you to add charge capacity.
For more on AGM charging see:
- https://www.cruisingworld.com/managing-your-charge-account#page-2
- http://stevedmarineconsulting.com/wp-content/uploads/2018/07/Sulfation-Negation.pdf
- http://stevedmarineconsulting.com/wp-content/uploads/2018/07/AGM-Charging-CW-June-July-16.pdf
- http://stevedmarineconsulting.com/wp-content/uploads/2018/07/AGM-SVRLA-Batteries.pdf
For more on engine under loading see this article.
Steve:
I read your article The Mysteries of Bonding Systems in the April 2015 Professional Boat Builder. Answered most of my questions. However it didn’t answer one:
Can I piggy-back a connection such that I can connect a single new bonding wire to a raw water pump for my AC system, to a thru hull or motor mount that is connected to the vessels grounding strip?
Thanks.
James Felds
Jim:
Let me begin by asking, why do you believe you need to bond the raw water pump?
If the raw water pump is powered by 120 or 240 volts AC, then it is already, or should be, bonded/grounded via the green AC safety ground wire. Supplementally or double-grounding gear like this is not only unnecessary, it can be harmful. (If the pump manufacturer believed additional bonding was necessary, they would include a marked ground stud.) Many boat builders are guilty of this, assuming that the more grounding one has the better, however, that’s not necessarily the case. Dometic’s installation manual identifies this potential problem with the following warning…
“The AC ground of the chiller must be connected to the AC ground of the boat. Within the boat itself, the AC ground bus must be connected to the DC ground bus at exactly one place (no more, no less)” (italics mine). Adding a bonding wire to the pump would be in addition to its AC safety ground, which in turn would make for (at least) a second connection between the AC and DC ground busses, which is a violation of the above directive.
Multiple, parallel grounds can lead to “objectionable currents” which can actually induce corrosion.
If your pump is properly wired to the AC electrical system, including the green safety ground wire, there should be no need to add a bonding wire.