
For most users, little thought is given to properly breaking in a generator…
Stories about marine diesel engine longevity are legion and it seems to be that the harder they are worked, the longer they last. While that may sound counterintuitive, in fact, it’s a proven fact. In my experience in the marine industry as a mechanic, boat yard manager and now consultant, I can’t ever recall seeing a marine diesel engine that died of “over-use”. That is, they rarely if ever wear out. Instead, they die of several other causes, which include accessory failure (heat exchanger, exhaust manifold and raw water issues), poor maintenance (infrequent oil and coolant changes among others) and under-loading (running lightly loaded, which leads to carbon and varnish formation). Related to the latter is the insidious poor or improper break-in of engines, particularly generators.
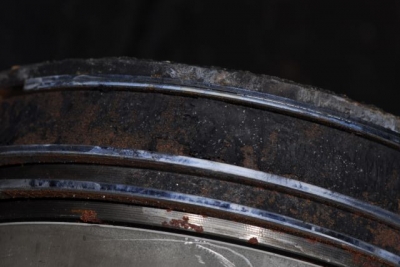
The rust deposited adjacent to these piston rings clearly indicate moisture has been in this engine’s cylinder.
It’s tough to properly size a generator. It seems that no matter what the designer or builder does, he or she chooses a generator that is either too big or too small (often the former). The reason for this selection tension is that gensets must be capable of running intermittent heavy loads, the most common of which are air conditioning compressors. In order to carry, and more importantly start this load (start up loads for motors and air-conditioning compressors can be three times their running load), the genset has to have enough ampere guts. The rest of the time, however, when the AC is off or when it’s not starting up, the generator is often grossly under-loaded. Running chronically under-loaded, as has been discussed by this author many times, is simply undesirable for any engine, particularly a diesel.
The challenge generators face, however, is even more vexing. In order to live long, productive lives they should, ideally, be loaded between 50% and 75% most or all of the time. I know, that’s unrealistic but remember, I said ideally. There’s only one thing that’s more important than running properly loaded and that is obtaining proper break-in.
Break-in is a process whereby the engine’s piston rings properly seat or wear into the cylinder walls. Break-in typically occurs or does not occur without the operator’s knowledge, so there’s no easy way to be sure it’s occurred, particularly if the generator has been operated before you’ve purchased the boat.

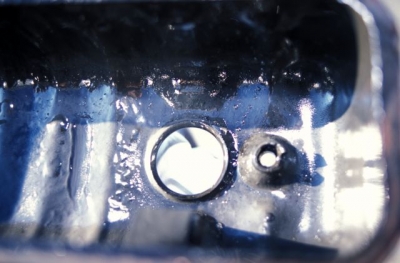
Properly broken-in cylinder walls. Note the crosshatching remains intact.
The cylinder walls inside an internal combustion engine are, contrary to popular belief, not smooth and shiny. In fact, they are intentionally “scratched” or scored in a fine cross hatch pattern, which creates a series of mini-peaks and valleys. The piston ring’s face; the portion of the ring that rides along and over the cross hatched cylinder wall, is narrow so only a small portion is actually making contact with this cross hatch surface. Each groove in the cross hatch acts as an oil reservoir, which holds oil, allowing a film to be created between the ring and the cylinder wall. During proper break-in, as the piston and rings move up and down in the cylinder, they wear against and into each other, establishing a custom fit of sorts (this is one of the reasons oil must be changed early on in a new engine’s life, the wearing in creates metal contamination within the lubricant). The tops of the peaks are worn flat, while the valleys remain intact to hold oil. The ring face wears too, which increases its surface area, supporting the oil film. When this occurs properly, just the right amount of oil film is maintained between the flattened ring face and the flattened peaks of the cross hatch.
When an engine is operating, a phenomenon known as break mean effective pressure (BMEP) is created within the combustion chamber. This is the pressure created by the controlled burning and expansion of the fuel air mixture. The higher the power setting of the engine (i.e. the greater the load), the higher the BMEP. This is critical to the break in process because it’s what ensures that the piston rings are pushed against the cylinder walls with sufficient force to achieve proper break-in. If insufficient BMEP is present during break-in, in other words, the generator is lightly loaded for its first 50-100 hrs, the cylinder walls will glaze or develop a polished appearance. When this happens, there’s no going back. Once the cylinder walls are glazed, the only solution is to remove the cylinder head and hone the surface to re-establish the cross hatch.
When there is sludge inside your valve cover, there is blow by occuring in your engine. It’s a result of a mixing of oil and water vapor, the latter is contained in exhaust gasses.
The proof as to whether the break-in occurred may not overtly reveal itself for a thousand or more hours. If glazing occurs, then compression is compromised and combustion gasses travel around the piston rings, often referred to as blow by, and into the crankcase. These gasses are hot and they carry with them combustion byproducts like soot and water into the crankcase, which leads to excessive heat, oxidation and oil contamination. It’s also more likely that oil will slip by the rings into the combustion chamber during the intake stroke when glazing is present, which means oil is consumed and carbon is created within the combustion chamber.
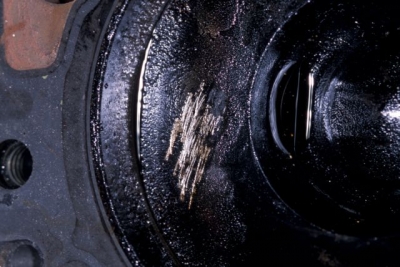
This valve and cylinder head should be free of soot and gunk build-up.
When blow by is excessive, these gases are often visible or apparent at the outlet of the crankcase ventilation hose. This is a hose that travels from the valve cover of the generator’s engine either down the side of the block where it vents or it may be routed to the engine’s air intake manifold or filter, where normal crankcase gasses are consumed and burned by the engine. It’s normal for a small amount of gas and water vapor to exit from this hose, however, if what looks like steam, water, oil, or worse – milky froth are constantly dripping or running from this hose, it’s possible the engine is suffering from excessive blow by, which is nearly always a result of worn or improperly seated piston rings (it’s unlikely that the rings would be worn out in less than 10,000 hrs if broken in and operated properly there after). A more objective assessment of an engine’s potential blow by involves a compression test, a leak down test or a crankcase pressure test. Any or all of these will reveal whether blow by is excessive.

Monitor your AC panel ampere meter to ensure proper break-in load.
Where generator break in is concerned, the first 50 to100 hours is critical. It’s important that the generator be placed at 75% load, achieving sufficient BMEP for this period of time. Many generator manufacturers specifically call for this procedure, spelling out the details in the installation and owner’s manuals. For instance, Alaska Diesel Electric, manufacturer of Northern Lights generators says…
“The first 100 hours on a new or reconditioned engine are critical to its life and performance… Maintain at least a 75% load on your generator set for the first 100 hours. Varying the load will help seat the rings.”
If you are having a new generator installed, or if you are taking delivery on a new vessel, insist that the manufacturer’s break in procedure be followed for the generator. If the builder or installer is not willing to do this, you can do it yourself; however, it’s important that the generator not be run for longer than necessary to test the installation prior to break-in. In order to achieve the proper load, preferably 75%, it may be necessary to add one or more heaters (I prefer the radiant, oil filled variety for this process, they are safe and utilize no exposed heating elements) in addition to your air conditioning units until your amp meter indicates approximately 75% load. This load should be varied periodically, which normally happens as AC or heating units switch on and off thermostatically. Finally, check your owner’s manual. Most generator manufacturers call for other procedures in conjunction with or upon the completion of break-in. These include oil and filter change, adjustment of belt tension, valve adjustment and torquing of cylinder head bolts to name a few.
If you are among the unfortunate vessel owners whose generator is suffering from glaze induced blow by, all is not lost. After confirming this diagnosis using one of the above-mentioned tests, the cylinders can be honed and then proper break-in carried out. Regrettably, beyond honing or wholesale replacement, there are no silver bullets for this scenario, and thus it’s often best to cut your losses rather than struggle on with a balky generator that’s suffering from blow by; it won’t get any better. With proper break-in and maintenance, on the other hand, you can expect a generator to operate reliably for many thousands of hours.
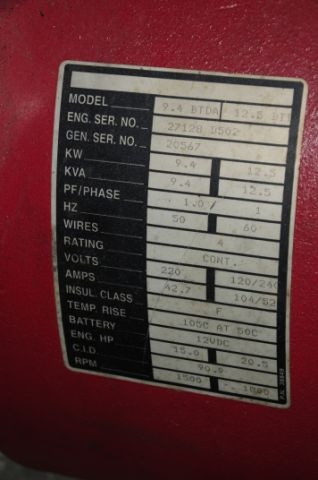
Review your generator’s commission plate, based on its maximum output capacity you’ll be able to determine the proper break in load requirements.
For more information on the services provided by Steve D’Antonio Marine Consulting, Inc. please e mail Steve at info@stevedmarineconsulting.com
or call 804-776-0981

