
Photo Essay: The Misplaced Washer
Text and photos © 2020 Steve D’Antonio Marine Consulting, Inc.
It’s a truism, of which even the most technically challenged is aware, metal conducts electricity. However, not all metals conduct electricity equally well. The conductivity of iron alloy metals such as steel, and stainless steel, is only a fraction of that of copper, when like masses are compared. It’s why, for instance, a large engine block is capable of safely conducting high current when used as part of a starter or alternator charging circuit. Silver is the most efficient conductor, with copper a close second, and then gold significantly beneath both of these in conductivity. Measured on a scale of 0 to 100, with copper being 100, iron is about 15.
While iron, steel and stainless-steel conduct electricity, the danger arises when these poor conductors, coupled with low mass, i.e. a small component, are called upon to convey high current. The image shown here illustrates, albeit insidiously, exactly the type of scenario that should be avoided. A 300-amp fuse is separated from its fuse block with a thin stainless-steel washer. This is an all too common scenario, and I can only assume the installers who unknowingly make this grievous error believe inserting the washer into this gap is somehow advantageous. In removing stainless steel washers from installations of this sort, I have observed some that have turned purple, the result of extreme heating. When such cyclical heating occurs, the thermal expansion and contraction can loosen the connection, which in turn leads to arcing, and carbon accumulation, and thus even higher resistance, and heat generation. In short, this is a fire hazard, one that should be avoided at all costs.
Inspect your high current connections at fuse holders like this, starters, alternators, battery terminals, switches, and bus bars. Ensure that ring terminals make direct contact with conducting surfaces, with nothing in between.
Ask Steve
Good morning Steve,
I am writing, in hopes of learning more about alignment. I have a 1974 Modutech. The engine and transmission are about as old as the boat (80s-ish). The main is a John Deere 4045. The gear is a Paragon V-drive. (P 44-L, I think)
I have a vibration and it’s been said that I need an alignment. I live in Juneau, Alaska. Marine services are hard to get. They are super expensive too. I understand that there is no substitute for a competent and qualified person. I also, know that finding that “competent” person is a challenge too. A lot of money can be wasted trying to find the one that knows how to diagnose things. As opposed to just throwing parts at it. I don’t have that money. Often times I find myself on my own.
I have come across an article that was super helpful. I am a structural ironworker by trade and currently work for a gold mine. Because of these two things, I have some knowledge of, or access to, people that can help fill in some gaps. In this article I read about shimming the strut. The materials used for that were some FRP? A G10 or GPO? I searched online and am learning about these materials. What are they? Who on the west coast would have them? I think that cuts are best made with a? Also, are laser alignment tools affordable for someone like me? If not my next two choices are string lines and trial and error. What is bedding? Can 5200 be used for this?
I have so many questions.
Jason Catrett
Jason:
Part I and Part II of Engine and Shaft Alignment, if you haven’t seen them already, will be helpful in understanding what’s involved in the engine and shaft alignment process,
Interestingly, in many cases misalignment, even severe misalignment, does not cause vibration, primarily because it is constant. Therefore, I’d make certain the issue is not with, among other things, the propeller condition or installation on the shaft, or shaft coupling centering.
This article on propeller installation may be helpful.
G10 and GPO3 are structural composites, the former is epoxy based, the latter polyester resin. Either will work as shim material for a strut or shaft log. Many composite suppliers carry these, a Google search will yield good results. McMaster Carr is one mail order supplier I’ve used. It can be cut the same way as fiberglass, with reciprocating or circular saws, and conventional grinding pads.
You can make a relatively inexpensive laser alignment tool with some off the shelf parts, but the fabrication of precision tubular target fixtures may be challenging without access to a machine shop and lathe. The taught string or wire approach will work, and may be best for your application.
Bedding material is essentially sealant. For below the waterline applications it should be polyurethane or polysulfide, 3M 5200 is suitable, as is Sikaflex 291 and BoatLIFE LifeCaulk.
Caulk and Sealant Selection and Use
Hello Steve,
I was wondering if you have heard of SP Marine Services headquartered in Barnegat, NJ and Fort Lauderdale. They travel the globe specializing in all aspects of fuel tanks including service and repair.
The reason I ask is my 300 gallon diesel aluminum tank is leaking. SP said if conditions are favorable without removing the tank they can cut an access port and perform a weld repair to the interior.
I would not entertain this approach if the alternative of cutting open the sole of the boat to remove and replace the tank was not such a huge undertaking.
The boat is located in the Miami /Ft. Lauderdale area. It is a fiberglass 50ft. Island Packet sailboat 14 years old. Tank made from 5052-H32 aluminum .190 thickness.
Any other recommendations of a repair boat yard or facility will be appreciated.
Thank you,
Scott Thomas
Scott:
I’m afraid I have not heard of the company you’ve mentioned. In my experience, it is impractical to repair small diesel tanks in place. Doing so would require the tank to be gas-freed, to prevent any possibility of an explosion, and heat generated by the welding process must be dealt with, to prevent any possibility of fire. That can be very difficult to accomplish reliably on a small vessel. Also, the cost effectiveness of such a repair would need to be weighed against the cost of a replacement tank. On large tanks it almost certainly makes sense, in a case like this it’s doubtful.
As far as vetting those who can carry out a tank replacement, competently, I would begin by asking for three references for similar projects they’ve carried out. Then, use the criteria set forth in this article for selecting and working with a yard or contractor.
If you can be present while the work is being carried out, that would be ideal.
Steve,
The instructions for an Onan generator state that the medal case (sound shield) should be connected to the green wire system of the boat and there is a terminal on the outside of the sound shield for this purpose. I found this confusing because the serve cable from the generator to the AC power panel is grounded on the case of the generator with the white neutral wire (at the source of the power). The sound shield is connected to the generator frame, not insulated from it. Does this double grounding create a ground loop, with the required one place only connection of the green wire bonding system at the power panel?
Thanks for your help. I always look forward to your articles.
William L. Bowen
William:
If the generator manufacturer is calling for a separate ground for the enclosure, I’d be reluctant to disregard this. If it’s what I’m thinking it is, and these are standard on most gensets from Onan, it’s one of three studs that are located outside the sound enclosure. The ground stud isn’t specifically grounding just the enclosure, it’s grounding the genset base, and chassis as well, along with the block. This is in compliance with ABYC standards, which I’ve excerpted below.
This wire should be the same size as the DC positive cable. It’s in place to carry a DC positive fault or short to the generator enclosure, block or chassis. The AC safety ground, to which you refer, is too small to safety resolve such a ground fault without overheating, and because the generator start circuit is exempt from over-current protection, there’s no possibility of blowing a fuse or tripping a circuit breaker to resolve the fault. Therefore, a chassis ground must be present, and it must be sized so that it can carry a fault from the largest DC positive cable connected to the equipment.
Normally double grounding is frowned upon, however, in this case, along with inverters and battery chargers and other non-current carrying enclosures, it’s necessary.
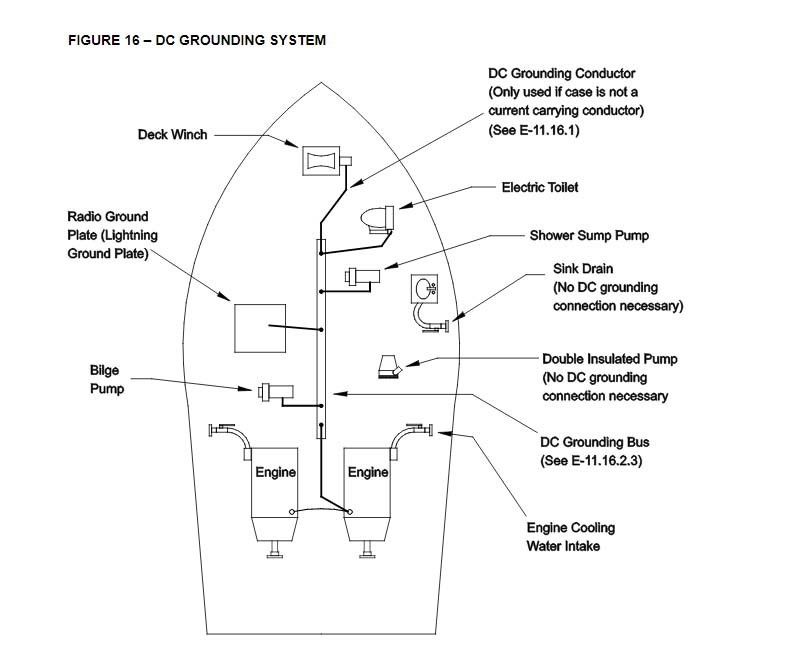
“ABYC 11.16.1 DC Grounding
If a DC grounding system is installed, the DC grounding conductor shall be used to connect metallic non-current-carrying parts of DC machinery and engine blocks to the engine negative terminal or its bus for the purpose of minimizing stray current corrosion and ensuring a fault current path in the event of a short circuit (see FIGURE 16).”
Hi Steve:
I very much enjoy your advice in your articles in your e-zine and look forward to reading your articles. I purchased a 1985 KK42. The previous owner did a lot of work on this vessel, and amongst other things, replaced the black iron fuel tanks with 2 X 200 gallon and 2 X 180 gallon aluminum fuel tanks. He also installed an ESI fuel polishing system. To my amateur eyes, the work looks very well done. However, I think the main problem with the fuel polishing system is one tends to do it in calm conditions while at the dock, or at anchor. Any “sludge” will be on the bottom of the tank and there is very little agitation inside the tank to release the sludge and “polish it out”. At least that’s my intuitive understanding. I replaced the polishing element once and there was no asphaltene on it.
So I think I need to bite the bullet and inspect the tanks prior to refueling. We’ve had the boat since 2013 and I believe the tanks are now ~7 years old and I don’t think the ports have been opened yet. Is this something that the owner can do, prior to refueling?
I can move the remaining fuel to one of the 200 gallon tank and work through the tanks one at a time. I read in an earlier article and that you discouraged use of absorbent oil pads as they shed fibers, so I have no intention in using them. So how should I go about doing this? Or should I engage a professional?
Another related question: What additive do you recommend for diesel fuel for naturally aspirated, non-electronic engines? Do they make a difference? Do they inhibit the formation of asphaltenes?
Thanks in advance
Jim Cave
Jim:
I would not discourage you from inspecting the inside of your tanks, particularly if the vessel has been dockside frequently, and in a sub-tropical climate. That combination can induce sediment and water collection on tank bottoms. Having said that , if you are using the vessel in a seaway, and filters are not clogging prematurely (you should be able to use 1,000 gallons of fuel without the vacuum reading on the filter exceeding the change threshold, about 5 in, of Hg), then it’s unlikely the tanks are contaminated.
Polishing systems can and should be used while underway.
I agree, the polishing system appears to be professional and well-installed. The manner in which it is plumbed to the tanks, however is of paramount importance. In order to be effective, it should draw from the bottom of one end of a tank (drawing from an area lower than the primary engine fuel pickup), and return to the bottom of the other end of the tank, thereby inducing a “current”, and stirring up sediment, which the filter can capture. Plumbing should be completely independent of the engine and genset fuel supply and return. This article provides additional details.
As far as tank cleaning is concerned, for badly contaminated tanks a hit water pressure washer is my weapon of choice. While it’s typically the purview of professionals, a very savvy do it yourselfer might undertake this.
For light contamination, scrubbing and scooping the inside of the tank using a non-metallic brush and scrapers, and then finishing with lint-free cotton rags works. If the inside of the tank is “speckled” with weld slag, use caution when wiping with rags, if they are leaving behind fibers then discontinue their use and simply scrub/scrape and rinse with clean fuel. There are host of other precautions which must be followed when undertaking this type of work, including wearing eye protection ad gloves, supplying ample fresh air, properly disposing of waste fuel and sludge, etc., and while diesel vapors are not generally considered explosive, under the right conditions, i.e. hot and atomized, they can form an explosive mixture. Pumping fresh air into the tank continuously before and during the cleanout process reduces this risk.
Finally, I would argue that there is no need to cover fuel tanks in an application such as this with insulation; the sound attenuation advantage it provides is marginal. If the insulation is adhered directly to the tanks it violates ABYC’s installation recommendations, as it can capture and hold water against the tank, which could lead to corrosion. Personally, I like to be able to see as much of a metallic fuel tank as possible, especially if it’s well-made.

