
Text and photos © 2021 Steve D’Antonio Marine Consulting, Inc.
From the Masthead

Call Me
It’s a phone call or email I receive several times a year; it usually goes something like this, “Steve, I’m preparing to retire, and in anticipation of that my spouse and I just signed a contract to build a new vessel, we’d like to talk with you about what features, equipment and options we should consider, can you assist us?” While I’m delighted to guide clients through this process, specifying the details associated with the boat they’d like to have built, the time to do this is before signing the final construction contract. Once the contract is signed, not only do you forfeit all negotiating power, there’s little incentive for the builder to make any changes once the deal is inked, changes are a hassle and they throw a wrench into the works schedule-wise. They can either say “no” to any change requests, or they can dis-incentivize the buyer with very high prices for those changes. In either case, you have little recourse.
Ideally, your goal as a buyer should be to anticipate as many of the customizations, additions and modifications as you can possibly think of before signing a final contract, and making the first payment. Doing so ensures the builder can deliver on these requests, it gives them a heads up regarding the complexity of the build, it preserves your negotiating power, and it will help the builder to more accurately develop a build and completion schedule, as he or she will know what’s expected of them for the bulk of the build. Change orders during a build, while almost always unavoidable, should be kept to an absolute minimum.
In my initial conversation with clients, wherein I describe my New Build Assist Program, many will say, “I only need a few hours of your time”. For two recently-completed 65+ foot expedition vessel builds on which I consulted, each of which took approximately three years from the initial call to the client taking delivery of the vessel, my interaction involved over 1,000 emails, countless phone calls, and multiple inspections of the vessels during the build and commissioning process. The latest iteration of my ‘new build notes’ document, which I’ve formulated over the past 15 years and scores of builds and refits (I added to it just this morning), consists of over 30 single-space pages. While you may believe you have only a few questions, as the familiar axiom goes, you don’t know what you don’t know, and that’s where my work begins. I don’t simply tell my clients what to do, I educate them so they can make informed decisions.
Regardless of whether or not you retain me for assistance with your build project remember, don’t sign the final contract until you have shared with the builder the details of everything you can think of that you’d like to do to make the vessel unique, and appropriate for your cruising plans.
This month’s Marine Systems Excellence eMagazine article covers the subject of stainless-steel rust staining. I hope you find it both useful and interesting.
Preventing Rust Stains on and Around Stainless-Steel Hardware
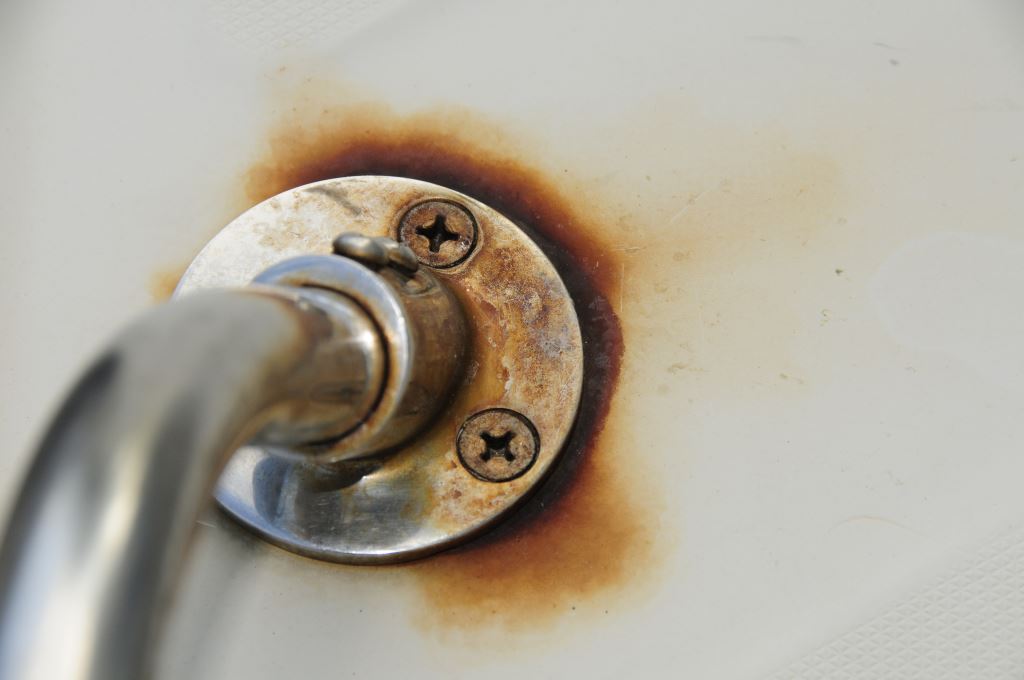
Rust or “tea stains” like those shown here are common for stainless steel deck hardware installations; they are usually easily avoidable.
Rust stains running across a deck or hull are nothing new. While unsightly, in many cases they are simply ignored or begrudgingly accepted as part of modern boat ownership. In some cases, however, that rust can be a message, and it’s not a very good one. If the staining is occurring adjacent to stainless steel hardware, then the “rust” is often the byproduct of a process known as crevice corrosion, whereby normally passive, corrosion-resistant stainless steel becomes active (see SDMC Marine Systems Excellence Miracle Metal). “Active” for stainless steel is analogous to rusting for ordinary mild steel. In both cases, the metal is compromised, although in the case of stainless steel it’s much more insidious as the flaking and shale associated with conventional steel is not present. Thus, whether it’s for cosmetic or structural reasons, preventing this staining is well worth the effort.
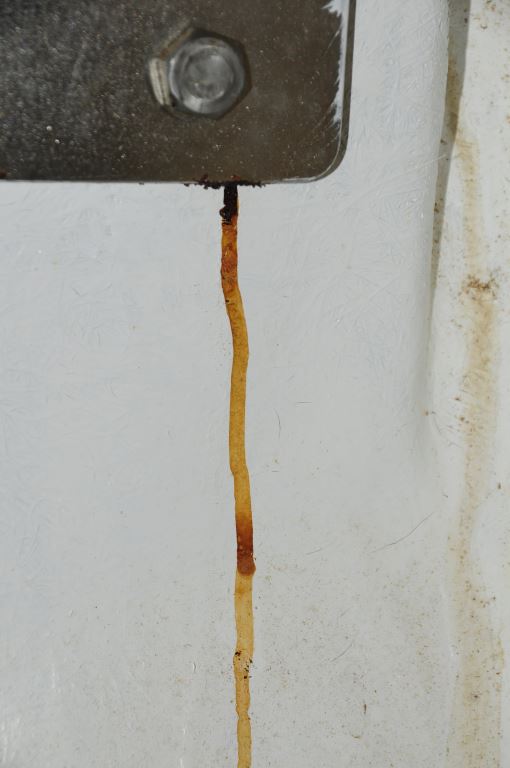
Chain plates are especially susceptible to this issue, as are the fasteners that support them, a failure of which could be catastrophic.
To prevent staining, sometimes referred to as “tea staining”, of this sort it’s important to understand the process by which it occurs. In order for stainless steel to remain rust-free, it must be continuously exposed to a source of oxygen. In doing so, stainless steel is able to replenish and maintain the tough oxide layer that allows it to resist rusting. Stainless steel used on deck is exposed to air, which certainly provides ample oxygen to maintain the oxide layer. Even stainless steel used below the waterline, provided the water moves freely and regularly, may be exposed to enough oxygen to remain passive. If, however, the stainless steel is exposed to an oxygen-poor environment, stagnant water for instance, then it’s likely to enter an active state.
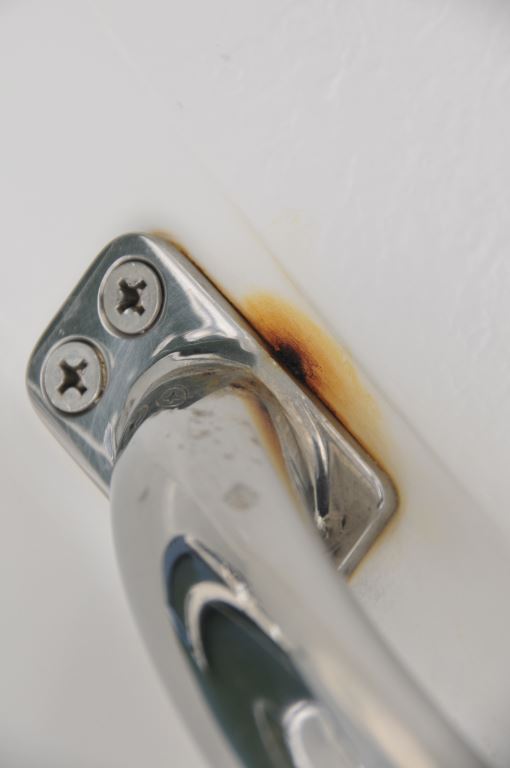
In order to remain rust-free, stainless steel must have continuous access to oxygen, however, water trapped beneath a flange like this quickly becomes stagnant and oxygen depleted, which in turn leads to corrosion and staining.
Where deck and above the waterline hull fittings are concerned, brown staining is usually a result of the use of low corrosion resistance, i.e. 304 or 18-8 stainless alloy and/or exposure to stagnant water. This alloy, by the way, is what’s used for 99% of all common fasteners, bolts, screws and nuts. In the first case, short of replacing the hardware there’s not much that can be done. In the latter case, however, there is a solution. If you look closely, what’s often clear about the staining is that it emanates from the perimeter of, or under, the offending hardware. This is because water becomes trapped beneath the hardware, where it becomes stagnant and thus oxygen-depleted, where it then leads to “activation” of the stainless steel; it begins to corrode. This phenomenon extends to fasteners as well, if the holes through which they pass in decks, cabins and hulls, are filled with stagnant water they will become active.
The solution for this problem involves removal, thorough cleaning, de-waxing, and fully bedding the hardware (see SDMC MSE Caulk and Sealant). That is, instead of applying bedding compound only to the areas where fasteners pass through, the entire base of the hardware, be it a cleat, port light trim ring, grab rail flange, chock or any other hardware, should be liberally bedded with sealant that will both create a watertight seal and exclude water that could migrate beneath the hardware base. Exclusion of the water is the key to preventing staining.
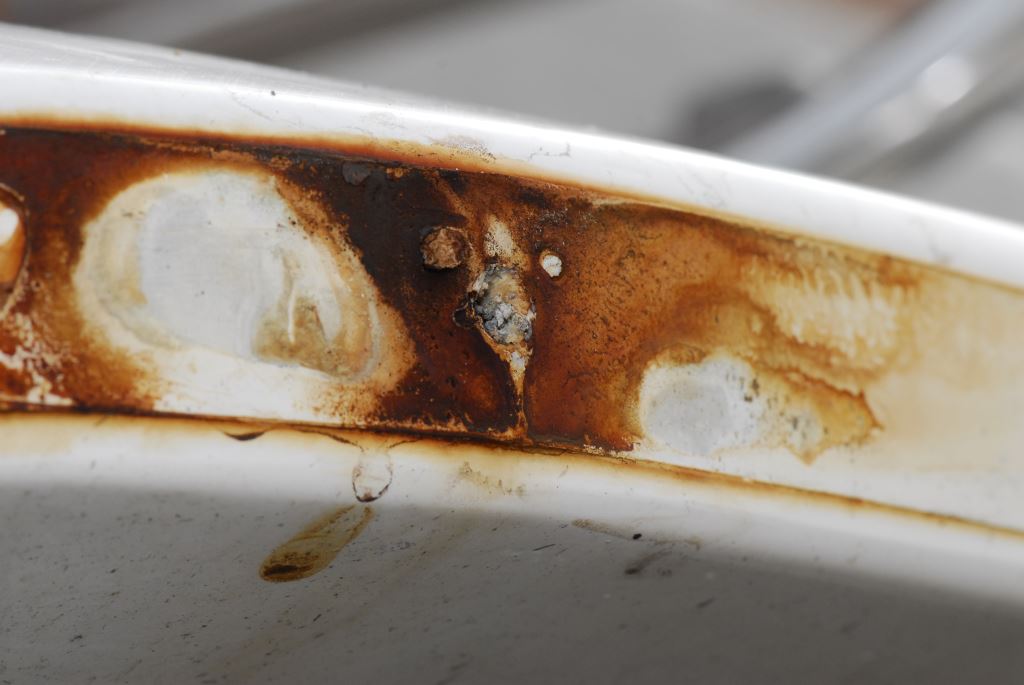
After this rub rail “iron” was removed, the evidence of water entrapment is clear to see. Fully bedding hardware is the solution to this problem.
In addition to bedding, polishing otherwise rough or irregular stainless steel will minimize surface staining (polishing removes micro-pits where corrosion gets its start). Avoiding water traps in recesses where (often undersized) fasteners are installed will also aid in prevention of crevice corrosion and staining. Fastener heads should fill the hole and countersink in any hardware, always use the largest screw that will fit, and it should be fully bedded. Even then, fastener recesses can form water traps which lead to staining. Using 316 stainless alloy fasteners, as well as polishing fastener heads, will reduce the incidence of staining.

