
The Ins and Outs of Cored Composite Construction
Hardware Installation
By Steve D’Antonio
Copyright July 2013
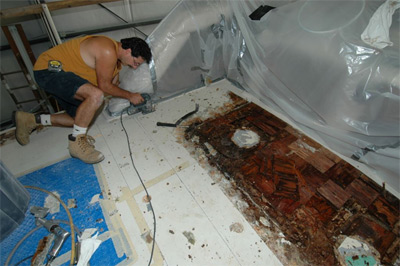
Fiberglass cored composite construction is a reliable, proven boat building technique that when executed properly yields a stiff, light structure.When it goes awry, however, as is the case here, repairs are nearly always costly and invasive.
Take a walk through a boat yard, down a dock or through a boat show. Gaze around and you’ll see the obvious, the “skin” of the modern boat, acres and acres of fiberglass, in fact you’re looking at polyester gelcoat or polyurethane paint. Under that gelcoat and paint, if you could see it or if you had a fiberglass worm’s eye view, you’ll find layers of fiberglass laminates often referred to in the industry as FRP or fiberglass reinforced plastic. Essentially, this is what fiberglass is made of, thin hair-like strands of glass, indeed real glass, that are the support network for resin that cures to a plastic-like, albeit it a hard one, consistency. Beneath that, in the decks, cabin and superstructure you’ll nearly always encounter the core material, which might take the form end grain balsa, synthetic foam or a plastic honeycomb structure. Some boat builders also use core in the entire hull, or more commonly only above the waterline alone.
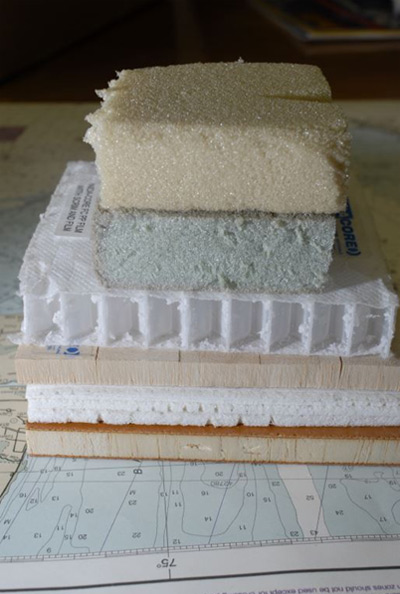 Core is available in a wide range of materials, from synthetic foam and honeycomb to balsa and plywood.
The purpose of the core is to add rigidity to the otherwise flexible FRP skin. On the other side of the core, the material that would be seen on the inside of the boat inside lockers or beneath decks for instance, is another similar layer(s) of FRP. Ideally, the inner and outer layers or skins should be of roughly the same thickness. This style of fiberglass boat building is referred to as composite core construction. When it’s done correctly by the boat builder and when it’s treated correctly by the boat owner and those working on the boat subsequently, it’s an immensely strong or stiff, comparatively light, reliable method of construction. It does, however, have one primary weakness and that’s water.
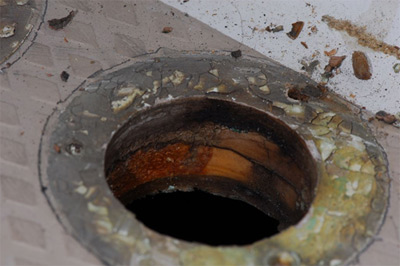 When core material, wood in this case, is visible at a deck “penetration”, such as this fuel fill, the only thing standing between it and water saturation is sealant. Sealant, even by most manufacturers’ own admission, has a finite life of no more, and often less, than ten years. And, don’t be fooled by the thin coating of resin on this core material, it is far too delicate to prevent water entry and does nothing to prevent water from entering through fastener holes, visible around the perimeter.
  Chain plate penetrations are notorious for acting as avenues of water ingress and core saturation. While any deck hardware can serve as an entry point for water, highly loaded structures push sealant to its limit, often resulting in early failure and saturation.
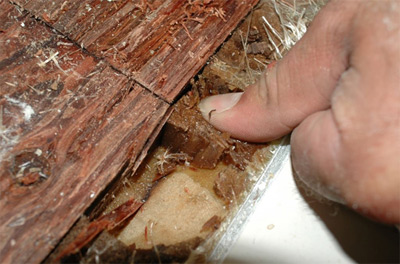
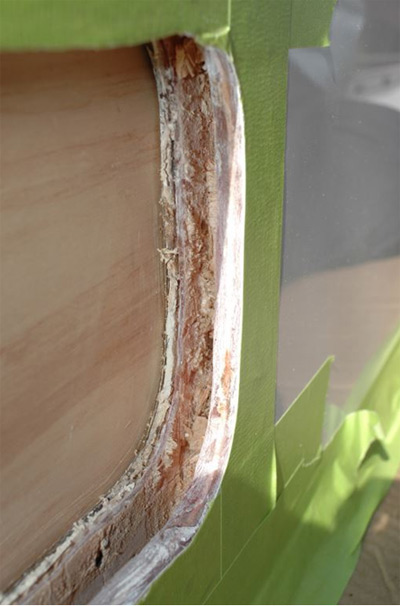
This flybridge deck has been cored with a mixture of small plywood blocks and end grain balsa, which is both saturated and decaying. While other core materials exist, ones that are less prone to water absorption, the failure is a result of execution rather than material selection; the core was not properly closed out.
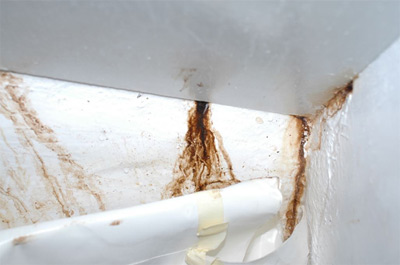
The telltale brown “coffee stain”, it’s not a pretty sight and it nearly always bodes poorly for the vessel and its owner. Proper core repairs are nearly always expensive, nearly always more expensive than the preventive measures.
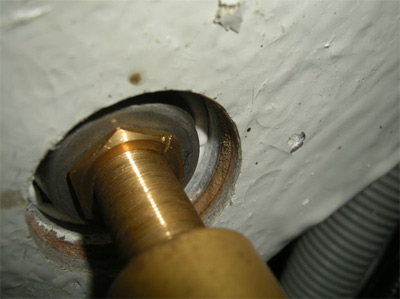
Plywood core material is visible at the penetration for a windlass foot switch. Bedding is also visible, when it eventually dries out; water will leak past the switch flange and be absorbed by the core.Because plywood and other conventional timer has a long grain structure, water can migrate far within the composite, often many feet from the entry point.
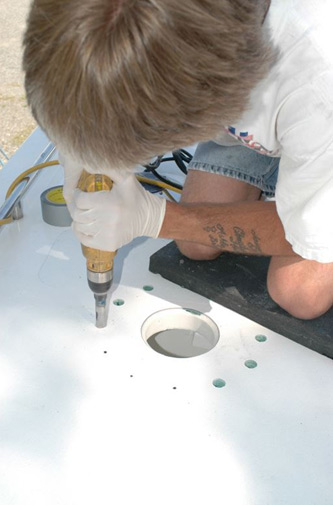
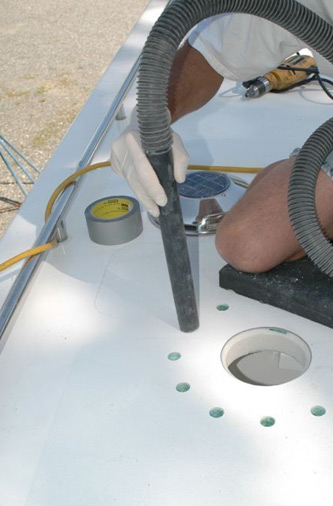
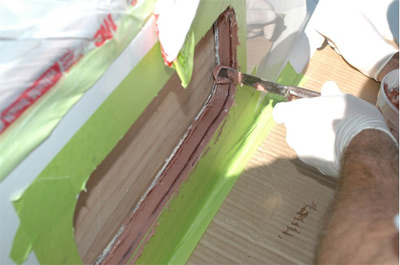
Drilling oversized holes in a cored composite structure…
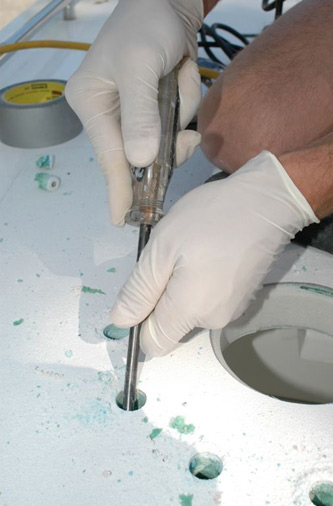
 Vacuuming out the loose core material.
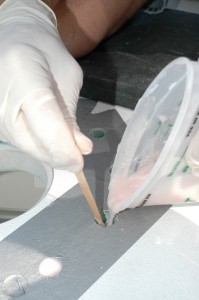
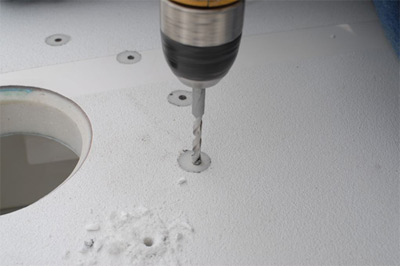 Re-drilling through the cured epoxy.
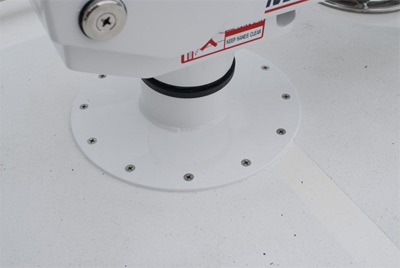 The finished product, this crane has been installed in a manner that precludes water entry into the core. If, when, the bedding fails water may leak past the fasteners or stand pipe, however, it will not enter the core.
Bedding Preparation
Once the epoxy has fully cured, re-drill both holes slightly oversized and chamfer the edges of the outer hole to create a land or recess for sealant. A ¼ (.25)” fastener would call for a 5/16 (.3125)” hole. Now, wipe the area down with a damp rag to remove amine blush, a water soluble wax that forms on the surface of cured epoxy. Solvent is not necessary forthiswax and it should not be used. Then, wipe the hardware to be installedand the fasteners, as well as fiberglass or gelcoat, with a clean rag moistened with 3M General Purpose Adhesive Cleaner to remove wax, oil and other contaminants.
 Degreasing, de-waxing or de-oiling is among the most important preparatory steps for hardware bedding.
Solvent must be used in this case because these contaminants are not water soluble. Ideally, hardware should not be bedded over non-skid surfaces. In practice, particularly for after-market hardware installations, this may be unavoidable. When it is, every effort should be made to thoroughly clean and free non-skid of dirt, debris and especially wax. Doing so may require the use of a stiff plastic bristle brush and solvent.
The Humble Rag, Not all are Created Equal
Most rags, whether purchased as the common ‘bag of rags’ or those that are your own recycled T shirts, are contaminated with laundry detergent residue and surfactant. This residue can contaminate bedding surfaces; however, rinsing rags with clean water and allowing them to dry before they are used for hardware installation wipe downs will eliminate this potential source of failure. The propensity of these contaminants, amine blush, oil and wax, to cause sealant failure should not be under estimated, just watch a clean white rag turn black as you wipe down the hardware.

 This through bolt is compressing and crushing the core within this cored composite structure. If the laminate was solid in this area, if high density core material had been used, or if it had been reefed and back-filled, this failure would not have occurred. Make no mistake about it, this structure is now compromised, it is weaker and more prone to water penetration.
Bedding and Hardware Installation
Finally, apply polyurethane or polysulfide bedding compound to the bottom of the hardware as well as to the fasteners. (If the bedding will be visible after the installation is complete, as a fillet for instance, make certain it is of the UV resistant variety. Do not apply bedding compound to the portion of the fastener, washers, nuts or backing plate inside the vessel; omitting sealant here will allow water to leak into the vessel when the outer bedding fails, letting you know it’s time to re-bed. Bedding on the inside of the fastener will only hold the water in the fastener hole, which may lead to crevice corrosion of stainless steel fasteners, or water penetration into the core.
Contrary to dockside lore, fasteners should be fully torqued at the initial installation. There are some who practice a two stage torque process, however, it’s not one I’ve embraced and with good reason. The process calls for lightly torqueing fasteners, allowing bedding compound to cure, and then returning to fully tighten fasteners. The presumed logic is the cured sealant becomes a gasket of sorts. In reality, and particularly for loaded hardware such as winches, windlasses, stanchions and cranes, the leverage imparted to the hardware often leads to ruptured sealant “gaskets”. If fastener holes include the aforementioned chamfer, the sealant that is deposited there creates an O ring that cannot be crushed or ruptured. Having practiced both approaches on many occasions, I can say with assurance, the two stage torque down and gasket process is considerably less reliable.
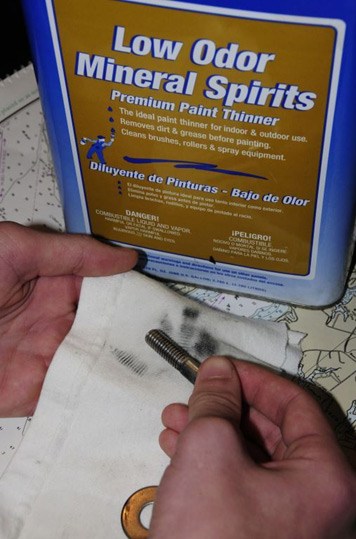
Clean up as much excess sealant as possible, you should have plenty of ‘squeeze-out’, excess sealant that is pushed out around the hardware, forming a fillet of sorts, using a clean dry rag and then finally using a rag moistened with the solvent specified by the sealant manufacturer (my solvents of choice for this process are 3M General Purpose Adhesive Remover or mineral spirits). Do not clean sealant using denatured alcohol as it will indefinitely inhibit the curing process of the polyurethane.
With this approach, you’ve achieved two ends. One, you’ve virtually eliminated the possibility of water entry into the core at the fastener penetration. Two, and just as importantly, the epoxy annulus prevents the fastener from crushing the core (a quarter inch fastener can exert over 500 pounds of pressure on the core, four closely spaced fasteners could apply a ton of force). If the fastener crushes the core it will almost certainly lead to water ingress because of the funnel-like depression that’s created.
Water is most likely to penetrate cored structures adjacent to hardware installations, particularly those that are highly stressed.
It is for this reason that simply coating exposed core with resin, epoxy or sealant, a procedure that is favored by far too many boat builders, boat yards and industry professionals, is nearly always inadequate, particularly on highly loaded items like cleats, stanchions, pad eyes, winches etc.
 This cleat is installed in a cored composite deck without the benefit of high density core or reefing and back filling. As a result, the core has been crushed, creating a depression, in which water will accumulate, where it will ultimately find its way into the core.
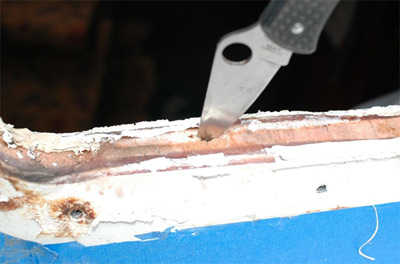
 Whenever a cored composite structure is penetrated, water penetration, and localized crushing, can be avoided by following the closeout procedure. If water does enter in improperly closed out structure, the repair process, depicted in the images above, is as follows…wet and decayed core; reefed out core; epoxy back-filling and cured epoxy filler.
Electronics installations such as antennas and radar scanners fall into a similar category. In that case the rules may be bent, slightly, penetrations for cables should, at the very least, be coated with epoxy, while holes drilled for fasteners should get the full reef and back fill treatment
Let the Buyer Beware
Before purchasing a new boat, ask the builder about his or her approach to core installations, or what the industry refers to as ‘core closeout’. If you are having hardware or electronics installed on a boat you already own, request a description of the closeout procedure. In either case, avoid leading the folks to whom you are posing the questions, simply say, “Can you describe how you deal with hardware installations on weather decks”. If the sole means of close out is sealant or hot coating with resin or epoxy, then either press for a different approach, or go elsewhere.
For more information on the services provided by Steve D’Antonio Marine Consulting, Inc. please e mail Steve at info@stevedmarineconsulting.com
or call 804-776-0981

