
From the Masthead
The Value of Carrying out an Inspection before Beginning a Refit
I’m penning this month’s Marine Systems editorial while in flight, returning from a two-week trip to Malaysia and Taiwan, where I visited boat builders, to inspect in progress new construction projects. There are few tasks I relish more than inspecting a vessel that is under construction; doing so affords me the opportunity to interact with, educate, and learn from, builders, as well as catching potential issues early enough in the construction process to make corrections. Beyond that, I revel in being immersed in the boat building process, and there’s no where better to do that than at the boat builder’s yard.
Earlier in my career I managed a boat yard, one that became known for its refit prowess. In many cases, the projects we undertook tore a vessel down to its bare bones, the equivalent of a home renovation, wherein the only things left from the original structure are the floor, ceiling and four walls. Such refits were both challenging and rewarding, enabling older vessels with sound designs, but worn-out systems, to be given a second chance. For some, the alternative to a refit was being cut up and placed in a dumpster, a fate I participated in, or witnessed, on too many sad occasions.
Where major refits are concerned, I warned customers before considering embarking on one of these, while they may sound romantic, they are anything but, instead they are known for their surprises, and for leaving budgets a shambles. There’s nothing worse for a boat owner to be told, part way through a refit, that it will cost much more than anticipated. That’s bad news for the yard too, because they are now dealing with an unhappy customer as well. Ideally, refits should only be carried out on a quoted, fixed price basis. That can be tricky for the yard, however, it is doable, provided the vessel is thoroughly surveyed or inspected before beginning the quoting process. I eventually learned that conducting a thorough inspection, prior to quoting or beginning a refit, paid dividends many times over, by substantially reducing the likelihood of encountering issues that were not anticipated. Ultimately, before beginning any refit I insisted on inspection, the findings from which became a basis for the quote.
Therefore, if you are contemplating a refit, consider the inspection a mandatory precursor, one that will pay dividends.
This month’s Marine Systems Excellence column covers the subject of troubleshooting engines that won’t start, the first of a two-part series. I hope you find it both useful and interesting.
When the Engine Won’t Start…
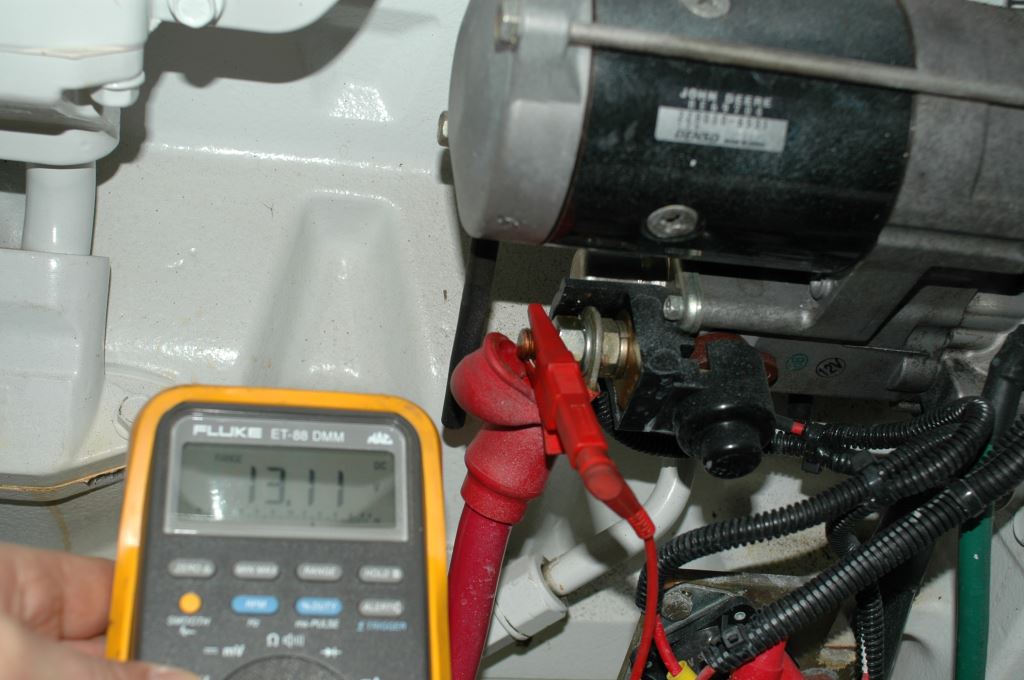
Voltage at the starter’s primary post should be nearly the same as that measured at the battery, if the difference is significant, then a connection issue exists.
No start terminology 101 and Safety
Not long ago a member of a forum in which I participate shared a plea for help with an engine that would not start, saying, “When I try to turn over the engine, I get nothing”.
If you are looking for assistance with an engine that will not start, it’s important to get the terminology right. If you turn the key to the crank position, wherein the starter usually engages and the engine rotates, and you get no response, the engine ‘will not crank’. If you turn the key and the starter engages, it ‘cranks but will not start’. Most key switches have three positions, OFF, RUN and CRANK, while many diesels include a ‘pre-heat’ position as well. The crank position is spring-loaded, so it only stays engaged while you are turning it, when you let go, the key returns to the run position, and the starter stops turning.
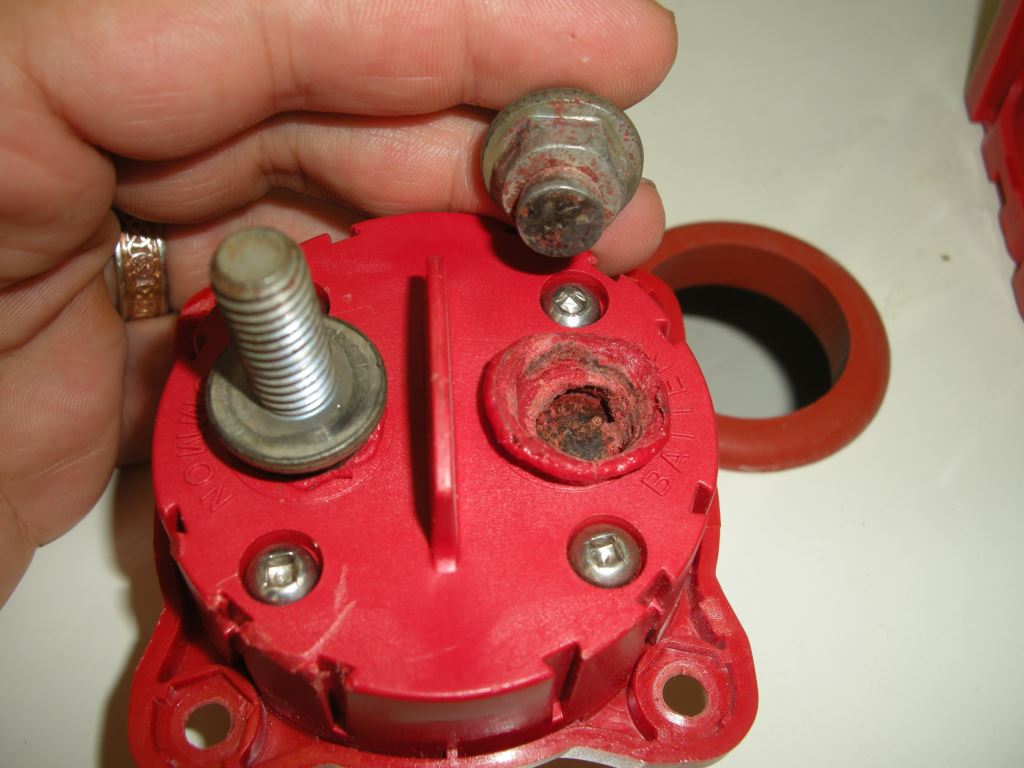
A failed battery switch can account for a no crank issue, these should be carefully checked, including tugging on the studs and ring terminals to ensure they are tight.
Before beginning your analysis work, remove metal rings and watch bands, these conduct electricity and can be dangerous when working around high current DC systems. Wear safety glasses, as a short circuit could cause sparks to fly, personally I wear safety glasses, mine are readers, when ever I’m doing any type of mechanical or electrical work, or just conducting an inspection, my eyesight is too valuable to risk an injury. Also, avoid loose clothing and sleeves, or hoodies with draw strings, as these can get caught in moving machinery.
Click or No Click?
If it does not crank, i.e., it doesn’t even click when the key is turned to the start position, it’s a clear electrical problem. While there are other possible causes, the culprit is often the starter itself, the battery, or wiring leading to the starter (from the battery or key switch) is probably compromised.
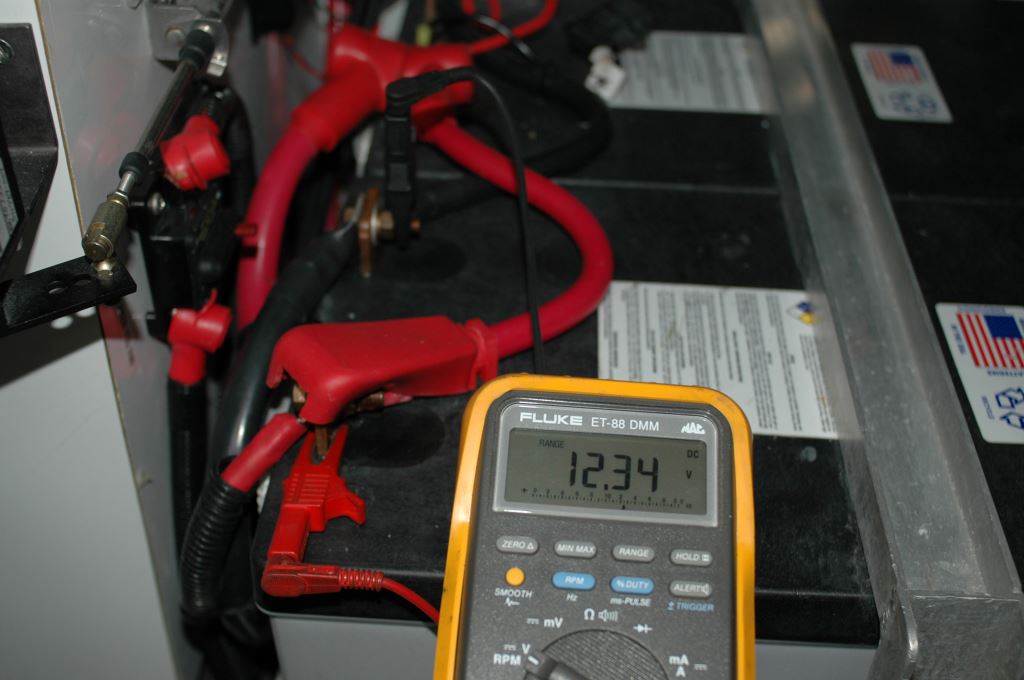
Checking battery voltage is one of the first steps in the no-crank troubleshooting process. A fully charged, and rested (for at least 6 hours) battery that is not receiving a charge, should read 12.6-12.8 (25.2-25.6 for 24 volt systems) volts.
Of course, check and cycle the battery switch, these can fail and contacts can become oxidized if not used for long periods. If you hear a click when engaging the key to the start/crank position, but it does not crank, it could be a weak battery, a poor connection, or a defective starter.
Poor connections account for a significant portion of failure to crank scenarios.
Do You Have the Power?
Begin by turning the key switch to the RUN position; when doing so do the instruments respond? If not, electrical power to the engine is somehow compromised; check all of the connections at the starter, both large and small, for any that might be loose, corroded or where ring terminals are not properly crimped.
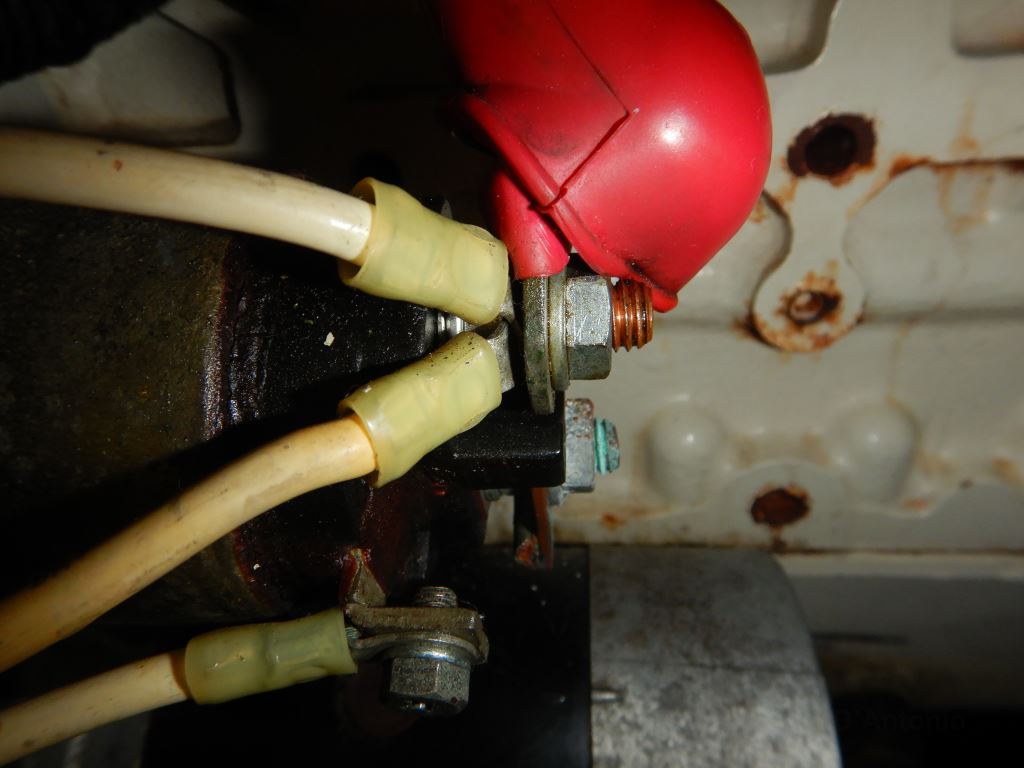
ABYC Standards call for ring terminals to be installed in size order, from largest to smallest; the example shown here is incorrect. Getting this wrong can lead to high resistance, and the associated issues that accompany it.
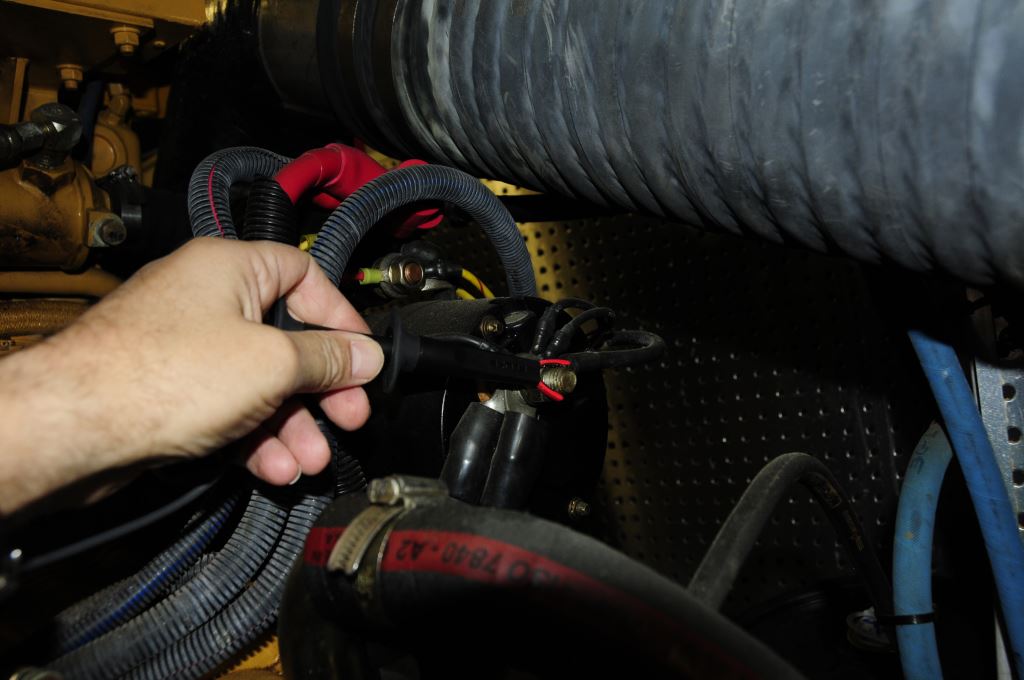
Don’t forget to check the large DC negative cable where it is connected to the engine block or in some cases to the starter directly. Also, check the wiring harness, this carries low current for starter commands as well as instrumentation. These often use large, rubber like plugs, some are round, with an overlapping sleeve, and somewhat water resistant, while others are flat, and have no water resistance. The latter are especially prone to corrosion. Disconnect the plug and look at the pins, scanning for both corrosion or signs of overheating, melting, or arcing.
Most engines have a button-type circuit breaker on the engine that protects the supply to the instruments and key switch, including the starting circuit, if it trips, the instruments will not respond when the key is turned to the run position, and the engine will not crank. These breakers can be notoriously difficult to find on the engine, as they are small, a little larger than an eraser, and sometimes painted the same color as the engine. You should know where yours is located.
Circuit breakers and fuses at the engine that supply power to the instrument panel, and key switch, are a critical link in the starting process. If they are tripped or blown, the instrument panel, and key switch, will be dead.
In other cases, this circuit may be protected by a fuse, and once again these can be hard to locate, as they are rarely labeled, so make certain to identify yours, and have spare fuses on hand. The drawback to the fuse arrangement is you can quickly go through your supply of spares while troubleshooting the problem, making a circuit breaker far more desirable. If your engine does rely on a fuse for this circuit, consider replacing it with a circuit breaker.
If you have no power to the instruments, and you can use a multimeter (see Steve’s multimeter use series here), then check for voltage at the start battery, it should show roughly 12.4-12.6 volts at rest, for a 12 volt system, and 24.8-25.2 for a 24-volt system, with no load and the battery charger off. If the charger is on, you should see something over 13.4 volts (26.8 for 24-volt systems).
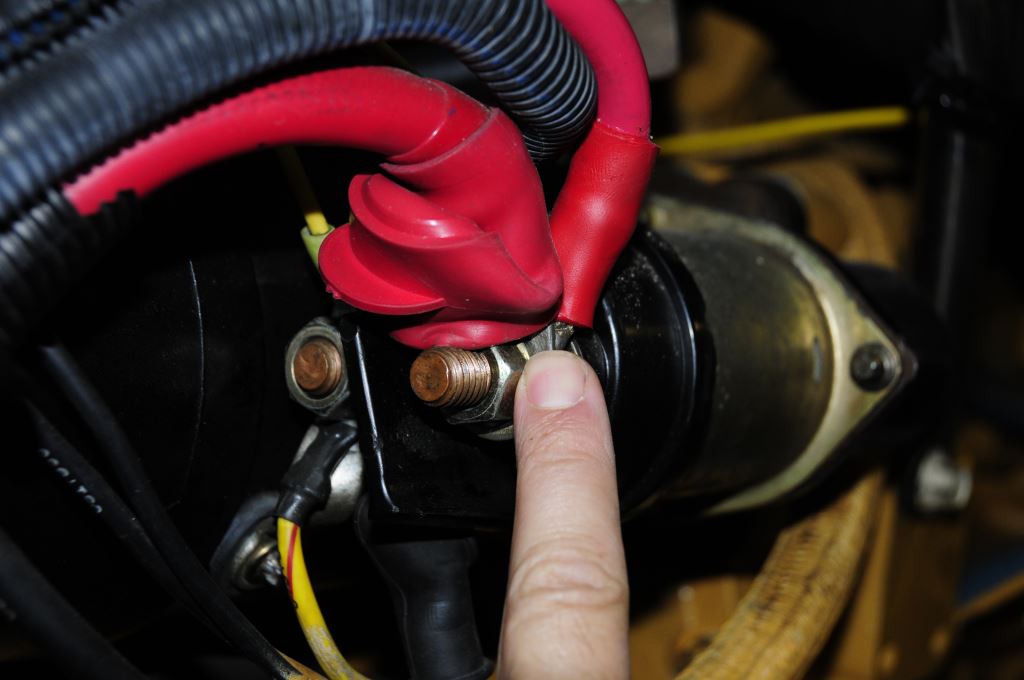
The large positive post on the starter should have voltage available to it when ever the battery switch is on.
If you have proper power there move on to the starter’s large post, to which the large red cable is connected. Touching the multimeter’s negative lead to the negative connection on the engine block or starter, the latter for isolated ground systems, and the positive lead to the starter’s positive post, you should see roughly the same voltage there. If there is no voltage there, that’s the problem, a battery connection is compromised, or the battery switch is off or it is defective. Even a dead battery will usually show some voltage in these locations.
When taking voltage measurements at the engine, be sure to connect your multimeter test lead to the same DC negative source used by the engine.
If there is Power
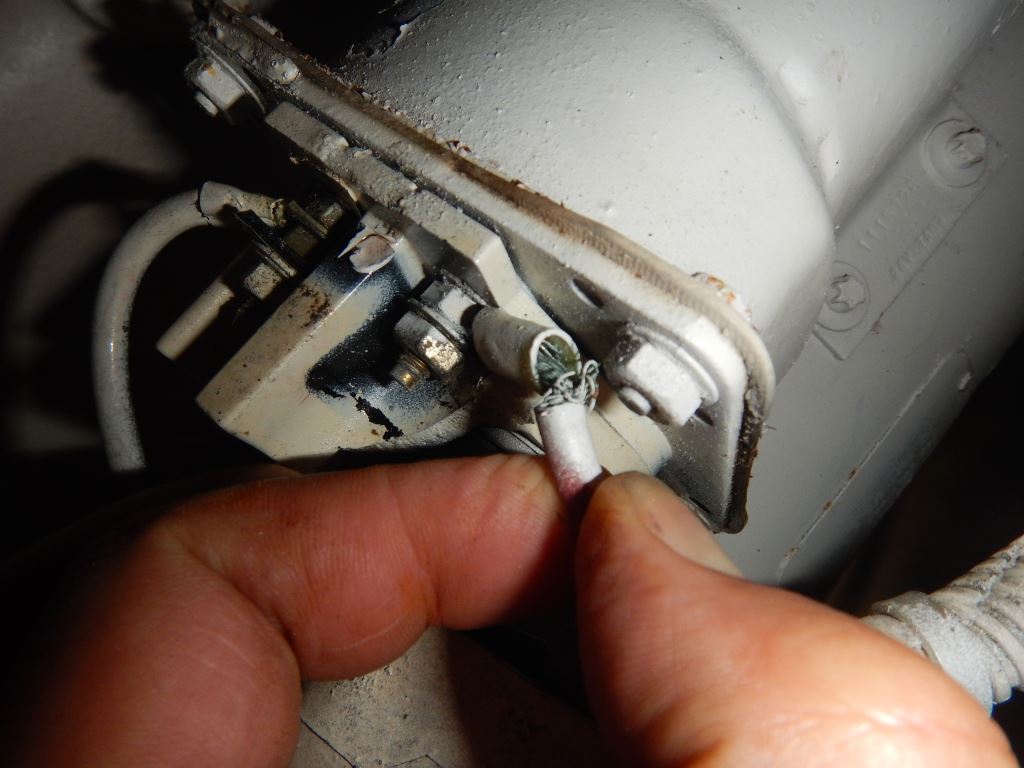
If you have power at the large starter post, the next test is at the starter solenoid, many engines use a yellow wire with red stripe for the cranking circuit, it should indicate 12 or 24 volts when cranking only. If the key is turned to the crank position and you observe no power at this post, the key switch or its wiring is the issue. Check the connections at the back of the switch, and the aforementioned harness plug.
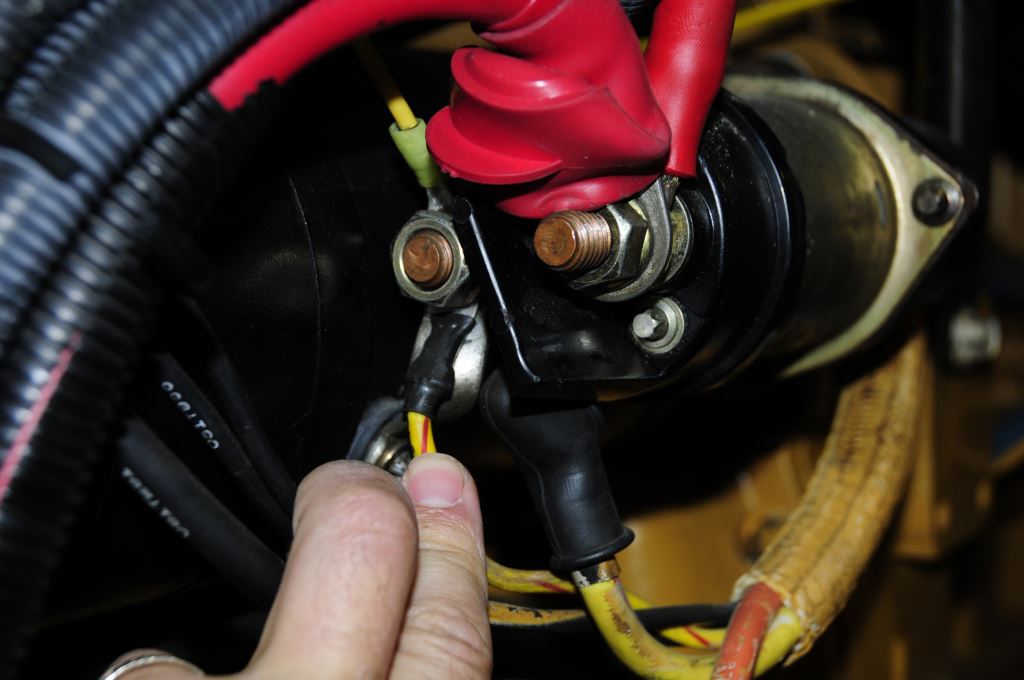
The wire that sends voltage from the key switch to the starter solenoid is typically yellow with a red stripe. If, when holding the key in the crank position, no voltage is measured on this wire at the starter solenoid, then the starter will not engage.
While conducting these tests it’s important to have not only a good DC negative/ground for the multimeter, it should be the same ground the engine is using, don’t connect the meter’s black lead directly to the battery. As noted earlier, connect it where the large black negative cable is attached to the engine block or starter. Before taking any readings, confirm this is a good ground by touching the red lead directly to the battery positive post or a known positive source, doing so will ensure all of your subsequent meter readings are valid. There are other myriad causes, however, the above are among the most common.
Glow plugs, if the engine is equipped with them, are usually actuated with a separate spring-loaded switch, however, some keys may also have a glow plug position. In some cases, the engine will not crank unless the glow plugs are actuated (reminding you to use them), however, if this switch is compromised, it can prevent the engine from cranking, so it should be part of the electrical troubleshooting process.
Assuming the engine uses a pump-line-nozzle injection system, i.e., a non-electronic, traditional diesel, if it cranks but will not start, that’s almost certainly fuel related. It could be a number of culprits, which I’ll discuss next month.

