
Photo Essay: Through Hull Durability
I vividly recall working at a yacht club on Long Island, when a vicious nor’easter slammed into the region. Several sailing vessels broke free from their moorings and ended up on a lee beach; some were only lightly damaged, while others flooded and filled with sand. In some cases, the vessels remained watertight until through hull fittings failed, and in every one of those cases, the failed through hull fittings were above the normal resting waterline. As the vessels laid down on the beach, the weight of the hull rested on these through hulls, causing some to fail; the failed fittings were all non-reinforced plastic, but again well above the normal resting waterline.
The image shown here is of a battered bronze through hull fitting, located in the topsides of a vessel that survived a hurricane, where it came to rest along a seawall. The distortion of the metal, as well as the damage to the surrounding fiberglass, is testament to the violence of the interaction between the vessel and an immovable object. Just because a through hull fitting is located above the normally resting waterline, doesn’t mean it won’t be tested. ABYC Standards define below the “waterline” as anything submerged when a power vessel heels 7 degrees, and for a sailing vessel anything that is submerged when heeled to the toe rail. In the case of the beached vessels, the failed through hulls were all above the resting waterline, but below the heeled waterline.
Ask Steve
Hi Steve,
I just came across your article published in Cruising World on corrosion that mentioned haloing.
I recently hauled out in Canoe Cove, B.C. and was very concerned to see major haloing around my SSB ground plate and also the smaller ship’s ground plate (separate), but no one in the yard had any useful advice to give me, regarding cause or even what to do.
I wondered if the Coppercoat being used for anti-fouling was contributing to what I saw?
I tried to clean up the SSB ground plate and the smaller one for the ship’s ground but left the halo pretty well untouched since I was perplexed; I was not sure if it was safe to use acid to remove it. I’m expecting to make regular trips with a scraper to clean off the marine growth in that area over the coming year when I plan to be in the warm waters of Mexico and the South Pacific.
Is there a simple way to clean off the halo (which looks like limestone) without damaging the surrounding Coppercoat? How do I prevent a recurrence?
If I understood your article correctly, it seems my boat is over-protected by its anodes, I have one chunky one for the hull and two small ones to protect the propeller, as well as one each on the prop end and prop shaft.
I just replaced all my bronze seacocks with TruDesign GRP ones so there’s now less under-water metal to protect.
Is the implication that my ship’s main anode is too large? It was almost completely gone when it was replaced in after being sat in Victoria Harbour during my over two- year absence due to the pandemic, which followed my 11-month solo circumnavigation, prior to which my boat was hauled for bottom cleaning and checking the underwater gear (the anode had looked fine then).
I wasn’t sure after reading your article, but was your suggestion that I should apply a small band of epoxy around the ground plate(s) to prevent contact with the Coppercoat?
Your comments would be very welcome so that I can act more effectively next time I haul out. Haloing apart, is it likely that other damage is being suffered by my GRP boat (apart from the expected fouling in that area)? It’s a sailing yacht, a Najad 380 Cruiser.
I look forward to your reply and thank you in advance for sparing the time to do so.
Kind regards,
Jeanne Socrates
Jeanne:
Until you carry out a reference cell test, all considerations regarding cathodic protection are speculation, so I’d like to see that accomplished first. Reference cell testing is described here.
Your sintered bronze ground plate appears to be heavily clogged, and I know of no reliable means of cleaning this. My recommendation would be to replace it with a solid copper plate, more details on that can be found here
The copper coat is clearly very heavily loaded with copper, and that can exacerbate this issue. There is no easy solution for this because you don’t want to diminish its antifouling properties, as that will promote growth. However, if you are over-protected, and that issue is corrected, it should reduce if not eliminate the haloing issue regardless of the Coppercoat.
The anodes on the prop/shaft should remain, and they are isolated from the other anodes and bonding system in any event. The hull anode is protecting only bonded underwater metals, so if you have fewer of those, after switching to non-metallic for seacocks, it stands to reason you may be over-protected.
The halo effect isn’t harmful per se to fiberglass.
Haloing can be removed by sanding, carefully so as not to remove too much anti-foulant.
Follow- up comments:
Thanks for this Steve… where can I get hold of a reference cell to use on board Nereida?
Reference cell linked here.
Hi Steve,
I need to replace my 25mm 54” prop shaft (37 years old, scored in stern tube bearing area), on a 42’ sailboat with Beta 50hp. I am buying one from General Propellor, an Aqualoy 22 (only grade they stock in 25mm, fine with me).
I have read your article on couplers and your preference for solid vice split for small HP setups. Attached is a photo of my existing split. I note it doesn’t have a keyway, I don’t know if this is an issue or not?
I don’t mind spending money when I need to… should I buy a new coupling (solid) with a keyway? Buck Algonquin.
If the coupler is okay to keep, bolt holes are 12mm, present SS grade 80 bolts are 10mm. Bolts are inexpensive, assume replace with Gen Prop 7/16 sets. They don’t actually say what grade they are, will check.
Any thoughts on Duramax vs. Glide stern tube bearings (due to lifting keel/rudder, I do tend to operate in shallower areas, so wondering about resistance to particulate like sand)?
Sincerely,
Rick Hearn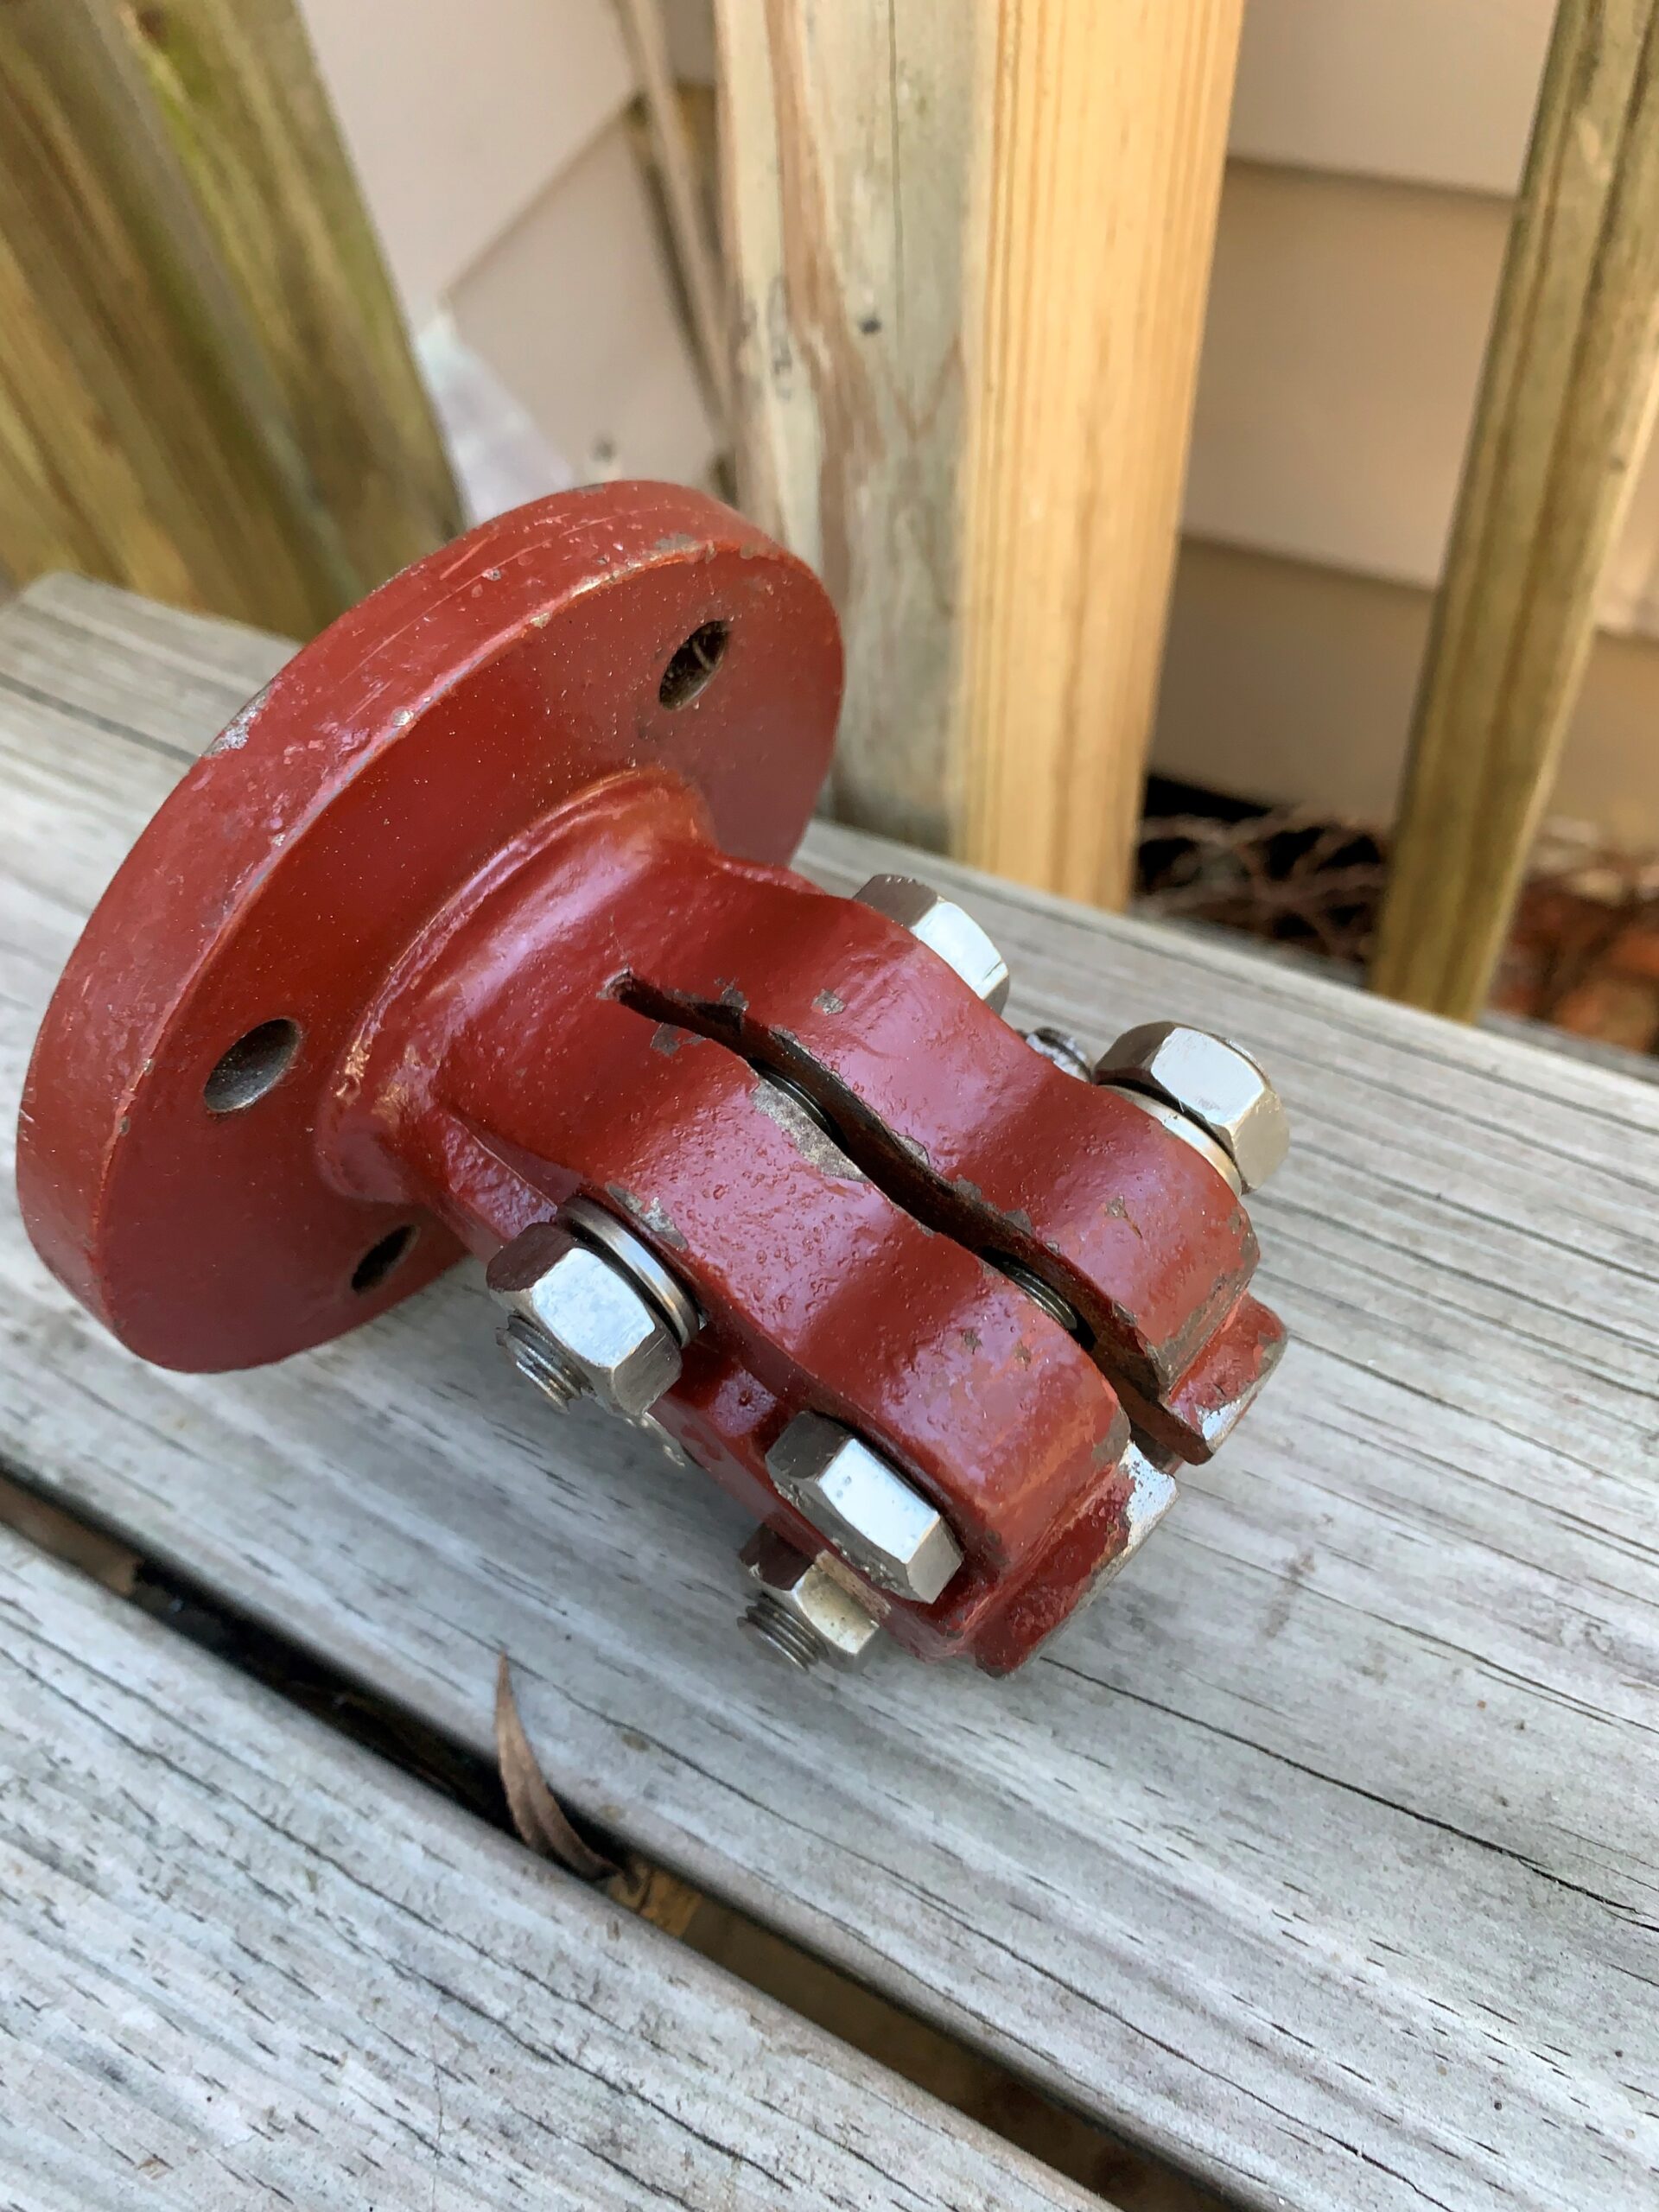
Rick:
Given the choice, I prefer a tapered coupling, and especially if you are replacing the shaft, the coupling itself is relatively inexpensive. For all the reasons detailed in this article, tapered couplings offer a host of advantages. Split couplings sometimes forgo keys, however, in those cases they typically use a scallop, clevis, roll or taper pin to retain the shaft. It appears yours has none of these, which would concern me. Again, a tapered coupling eliminates all of these issues. Alternatively, you could use a straight bore coupling, with keyway, which would typically use a set screw for shaft security.
Coupling fasteners should always fill the hole in the coupling (and anywhere for that matter), so these should be replaced with properly sized fasteners. For this application grade 5 mild steel is acceptable, grade 8 would be better. These will require corrosion inhibition.
I’m partial to conventional Cutless bearings from Duramax, again, for the application I suspect this will provide many hundreds of hours of service, with minimal shaft wear. If you were operating in an estuary like the Mississippi or Amazon, I might be concerned about sediment affecting wear, but sand should not be an issue unless you were operating in surf. Be sure to fit the bearing to the shaft before it is installed to confirm proper clearance. More on shaft bearings here.
Steve,
The sailboat I purchased had a questionable propane system installation, something I was aware of when I purchased the boat. From the cooktop to the lazarette were 3 sections of copper piping, with threaded fittings. In the lazarette was a Coleman stove-style tank, along with other non-propane related items. The lazarette also has a hawse pipe leading below.
I removed all the copper piping and built a dedicated propane locker, with direct overboard drainage. I have installed a 1-piece flexible propane gas hose from the locker to the cooktop location. I have installed gas sniffers below the cooktop and below the drain fitting on the locker. I have mounted the control panel at the companionway, so I can hit the off switch to the solenoid on my way out in the event of a fire.
The original installation included a shut-off valve at the cooktop, below the countertop. Based on the new installation, which I believe is ABYC-compliant, I don’t think I need this shut-off valve as it would introduce additional fittings into the system, with the potential for leaks. The solenoid I’ve installed in the locker effectively serves as the shut-off function.
What is your opinion about this installation?
Thanks for any input, and for all the advice I read on your site.
Richard C. Brown
Richard:
ABYC Standard A-1.9.5.6, clearly specifies, “Fuel supply lines shall be continuous lengths of tubing, piping, or hose from the regulating device, solenoid valve, or leak detector to the appliance, or to the flexible section at the appliance.” You may not insert a valve in this line unless it is in the LP locker, or on the weather deck. You do need…
1.7.3 A readily accessible manual or electrically operated (e.g., solenoid) shutoff valve shall be installed in the low or high-pressure line at the fuel supply (see A-1.7.6.1 for valve location requirements).
1.7.3.1 The valve(s) or its control shall be operable in the vicinity of the appliance(s) in the event of a fire at any appliance(s). If the cylinder shutoff valve is readily accessible from the vicinity of the appliance, the shutoff valve on the supply line is not required.
1.7.3.1.1 The valve or its control shall be operable without reaching over the top of any open flame appliance (e.g., cooking appliance burners).
1.7.4 In addition to the valve required at the cylinder, a multiple cylinder system shall be provided with a shutoff valve, or automatic check valve, at the cylinder manifold so that each cylinder can be isolated from pressure feedback from other cylinders.
For more on LP system installations, see this article.

